検索バッチはレシピ情報にとどまらず、レシピに紐づく様々なメタデータや、別バッチによって集約された情報などを収集する必要があるため、依存先のサービスや DB が多岐にわたっていました。
DB でいえばレシピサービスが利用している main, 集約されたデータが格納されている cookpad_summary, 検索や研究開発関連のデータが格納されている search_summary などなど……。サービスへの依存についても、料理動画サービスの API を叩いてそのレシピに料理動画が紐付けられているかを取得してくるなどの処理がおこなわれており、新規事業が次々に増えている現在の状況を考えると、この手の依存はこれからも増大することが予想されていました。
cookpad_all に存在している
旧検索バッチは cookpad_all と呼ばれる、レシピ Web サービスとその管理画面や関連するバッチ群、mobile アプリ用 API などがすべて盛り込まれたレポジトリ上に存在しており、各サービス間でモデルのロジック等が共有されていました。このこと自体はそれほど大きくない規模のサービスであれば問題になることはありません。しかし、クックパッドについて言えば、ロジック共有を通したサービス間の依存を把握するのが困難な規模になっており、「レシピサービスに変更を加えたらバッチの挙動が意図せず変わった」というようなことが起こる可能性がありました。このような状況であったため、特に新しいメンバーがコードに変更を加える際に考えるべき要素が多すぎて生産性が著しく低下し、バグを埋め込んでしまう可能性も高くなってしまっていました。
旧検索バッチでは、検索インデックスにおける全ての field が一つのメソッド内で生成されていました。そのため、新たな field の追加や既存の field の編集において必ずそのメソッドに手を入れる必要があり、メンテナンス性に問題を抱えていました。
たとえば、新たな field を追加する際に該当メソッド内に存在する既存のロジックを踏襲したとします。しかし、クックパッドには「レシピ」を表現するモデルが複数存在するため、既存ロジックで利用されていた「レシピ」を表現するモデルと、新たな field のロジックが参照するべきだった「レシピ」のモデルが食い違っており、意図した挙動になっていなかったといったような問題が起こることがありました。
また、研究開発部の施策で検索インデックスに field を追加したいケースなど、レシピサービスにおける検索機能の開発以外を主業務としているメンバーも検索バッチに手を入れることがありました。このように、ステークホルダーの観点から見ても複数の理由からこのバッチが編集されており、「単一責任の原則」が満たされていないシステムになってしまっていました。
実行時間が長すぎる
旧検索バッチではすべての field を生成する処理が直列に実行されているため、Rails での実装であるということも相まって実行時間が非常に長くなってしまっていました。
この時間はバッチの構成がそのままであるうちは今後も field の増加に伴って増大していくことが予想されていましたし、実行時間短縮のために自前で並列実行の実装をおこなっていたのも可読性やメンテナンス性に影響を与えていました。
fushigibana では検索インデックスの生成処理をサービスにおける意味やアクセスする table などの観点から分割し、「単一責任の原則」を満たすよう実装しています。分割されたクラスはそれぞれいくつかの field を持つ検索インデックスを生成します。最後にそれらのインデックスを join することですべての field を持った検索インデックスを生成しています。こうすることで、それぞれのクラスを並列実行することが可能になり、バッチの実行時間が短縮されました。
また、検索インデックスに新しく field を追加する際にも、既存のロジックに手を加えることなく新しいクラスを実装することで対応が可能となり、システム全体で見ても「オープン・クローズドの原則」を満たしたバッチとなりました。
旧検索バッチの改修に入る前にまずは現在利用されていない field を洗い出し、少しでも移行時の負担を軽減することを目指しました。
コードを grep して一見使われていなさそうな field について識者に聞いて回ります。
この辺りは完全に考古学の域に入っており、作業の中で過去のサービスについていろいろなエピソードを知ることができておもしろかったです。
この作業の後、最終的には 111 の field についてロジックの移行をおこなうことになりました。
Hi, this is Chris from Cookpad's Media Product Globalization department.
I'm going to discuss some pitfalls we've run into while working with AWS AppSync for iOS. This post is not a primer on AppSync, nor is it a general review of whether you should or should not use AppSync for your project. My goal is to point out some various lessons we've learned so far that weren't obvious at first. My second disclaimer is that AppSync itself is under active development, so you can probably expect that some of the points I cover in this post will be altered in the future.
Background
My team has been working on a standalone iOS app for shooting, editing, and sharing 1-minute, top-down recipe videos called Cookpad Studio (here's a completed example video). At the time of this posting, our app is still in closed beta.
The shooting and editing parts are local to an iOS device.
Video editor screens
But the sharing to the community part relies on a server backend to share data between users.
Community screens using AWS AppSync
For the community part of the app, we decided to use AWS AppSync and various AWS backend technologies as an alternative to more established frameworks like Ruby on Rails.
Our AppSync setup is a bit different than the standard use case. AppSync is designed to be configured by app developers through the Amplify CLI. Since our team has dedicated backend engineers, we've opted to do most configuration and server development through the AWS component services directly (e.g. AWS Lambda, DynamoDB, etc.).
SDKs
AppSync on the iOS side is an amalgamation of a few different AWS SDKs. Luckily, all of them are open source and you can dive into their code when necessary. The three SDKs we're using so far are:
Authentication - The SDK that facilitates user authentication via Cognito.
Storage - The SDK that facilitates file uploads/downloads to/from S3.
API - The GraphQL client that facilitates fetching and mutating records in DynamoDB.
The first thing to understand about these SDKs is that they're all very different. They were written at different times by different teams with different technologies and have evolved with different goals in mind.
To give you an idea of what I mean by different, here's some various specs about each SDK:
Uses a custom Promise implementation for async communication, alongside Cocoa conventions.
Uses .graphqlconfig.yml for additional GraphQL configuration.
Authentication SDK
Singletons
I generally prefer to use initializer-based dependency injection over singletons. This is often unavoidable, even when only using Apple's first-party SDKs.
I was pleased to find that code completion gave me a couple different initialization options for AWSMobileClient, the primary class for interfacing with the Cognito authentication APIs. The most complete of the initializers being:
I went down this path, discovering later that using this initializer leaves the AWSMobileClient instance in a very broken state.
AWSMobileClient is actually a Swift wrapper and subclass of the Objective-C _AWSMobileClient class. Inside you'll find some code that certainly stretches my understanding of subclassing rules across Swift and Objective-C:
Additionally, the initialize method that must be called by the client references itself and several other singletons:
_AWSMobileClient.sharedInstance()
DeviceOperations.sharedInstance
AWSInfo.default() - reads from awsconfiguration.json in the bundle.
AWSCognitoAuth.registerCognitoAuth(...)
Takeaway: For this SDK and the other AWS SDKs, you have to use the singletons.
Keychain credentials
The Authentication SDK uses the keychain APIs to store user credentials securely.
We changed server environments a few times during development. First, we had a prototype environment, then changed to a more long-term development environment, and finally to a production development in parallel with the development environment. By environment, I mean the keys used to locate our apps resources (e.g. PoolId, Arn, ApiUrl, ApiKey, etc.).
A few of our team members had installed and ran a release build of the app in the prototype environment at some point, thereby storing some Cognito tokens in their keychain. When we switched to the development environment, we started seeing deadlocks during our authentication bootstrapping process. The bootstrapping process happens on a cold launch and runs the required asynchronous AWSMobileClient initialization methods.
The debugging steps of deleting the app and reinstalling did not work because the keychain contents are retained by iOS across app installs for the same bundle ID.
Once we had determined that AWSMobileClient could not handle loading "bad" environment user credentials – user credentials created with a different AWS configuration parameters – I had to create special builds for these devices that called AWSMobileClient.sharedInstance().signOut() immediately on launch.
We actually saw a similar deadlock in AWSMobileClient when running the app on the iOS simulator during development, which threw me off the trail a bit during debugging.
Takeaway: Be careful when changing environment configuration parameters.
Drop in Authentication UI
The Authentication SDK includes a drop-in UI. Because we wanted to ship our app to beta users as quickly as possible to start gathering feedback, I was particularly pleased that I wouldn't need to write a custom UI for authentication.
Unfortunately, we found a few dealbreakers that prevented us from using the drop-in UI.
First, the drop-in UI has no support for localization. Since our first market is Japan, we definitely needed the UI to support Japanese. The localization issue has appeared in other contexts as well, especially errors returned by the SDK. I would keep this point in mind if the product you're working on requires any other language besides English.
Second, I was planning on presenting the authentication view controller from our root view controller, an instance of UIViewController. I found that the entry point to the drop-in UI requires a UINavigationController:
This seemed like an odd requirement since the drop-in UI view controller seemed to be presented modally. Digging into the code, I came to the same conclusion as this GitHub Issue: the only API used is the UIViewController presentation API.
There's also this long-running GitHub Issue with feature requests for the drop-in UI.
Takeaway: Using the drop-in UI may not be feasible for your use case.
Is initialize an asynchronous task?
The signature of AWSMobileClient's required initialization method is:
public func initialize(_ completionHandler: @escaping (UserState?, Error?) -> Void)
From this signature, I would assume this function is asynchronous, and therefore anything that depends on the result of this call needs to wait until the completionBlock is called.
However, if we look at the implementation:
internalletinitializationQueue= DispatchQueue(label:"awsmobileclient.credentials.fetch")
publicfuncinitialize(_ completionHandler:@escaping (UserState?, Error?) ->Void) {
// Read awsconfiguration.json and set the credentials provider here
initializationQueue.sync {
// ... full implementation
}
}
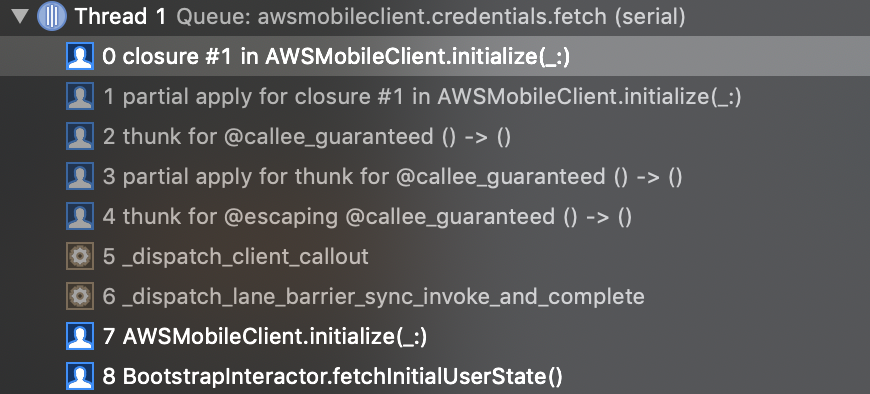
I wasn't sure what to expect when stepping through this code, but it looks like if initialize is called on the main thread, the implementation within the sync closure continues to be executed on the main thread. After the completion handler is called within initialize and that code runs, control flow returns to the end of initialize.
Callstack during `AWSMobileClient.initialize`
Takeaway: You can probably assume that AWSMobileClient.sharedInstance().initialize(...) is synchronous. However, if you're paranoid about the implementation changing at some point, treat it in your calling code as asynchronous.
Storage SDK
Initialization
Similar to our takeaway from the Authentication's section above about singletons, I recommend being extra cautious about the set up of your AWSS3TransferUtility instance.
Internally, AWSS3TransferUtility the class maintains a static dictionary of instances and a default instance.
There are some directions in the API docs about how to register an instance with custom configuration options.
However, if you decide to use the default instance like I did, you need to set the service configuration in a different singleton before calling AWSS3TransferUtility.default() for the first time. (I only learned this by eventually finding my way to the implementation of AWSS3TransferUtility.default() after struggling for hours with various unauthorized errors at runtime when trying to perform uploads).
Takeaway: Register your own AWSS3TransferUtility. Or if you want to use the default, set an AWSServiceConfiguration in the AWSServiceManager singleton before calling AWSS3TransferUtility.default() for the first time.
AWSTask for upload & download operations
The Storage SDK uses AWSTask throughout. AWSTask is a fork of Facebook's Bolts Framework.
Tasks... make organization of complex asynchronous code more manageable.
The usage of the primary Storage SDK's APIs for uploading and downloading are shown in the API docs, but since I wanted to ensure all codepaths for errors were handled properly, I had to dig a little deeper to understand how these tasks work under the hood. I'll use multi-part uploading as an example, but this applies to all three scenarios (uploading, multi-part uploading, and downloading).
I've annotated the types so that you can see the identity of what's actually flowing around all these closures.
letexpression= AWSS3TransferUtilityMultiPartUploadExpression()
expression.progressBlock = { (task:AWSS3TransferUtilityMultiPartUploadTask, progress:Progress) in
DispatchQueue.main.async(execute: {
// ...
})
}
letcompletionHandler:AWSS3TransferUtilityMultiPartUploadCompletionHandlerBlock= { (task:AWSS3TransferUtilityMultiPartUploadTask, error:Error?) ->Voidin
DispatchQueue.main.async {
// ...
}
}
lettaskQueuedHandler: (AWSTask<AWSS3TransferUtilityMultiPartUploadTask>) ->Any? = { (task:AWSTask<AWSS3TransferUtilityMultiPartUploadTask>) ->Any? in
DispatchQueue.main.async {
ifletresult= task.result {
// An `AWSS3TransferUtilityMultiPartUploadTask` was queued successfully.
} elseifleterror= task.error {
// The `AWSS3TransferUtilityMultiPartUploadTask` was never created.
} else {
// Not sure if this code path is even possible.
}
}
returnnil
}
lettask:AWSTask<AWSS3TransferUtilityMultiPartUploadTask>= transferUtility.uploadUsingMultiPart(fileURL:fileURL, bucket:bucketName, key:objectKey, contentType:contentType, expression:expression, completionHandler:completionHandler)
task.continueWith(block:taskQueuedHandler)
The overloaded use of the identifier Task in the types caused me some confusion at first. AWSS3TransferUtilityMultiPartUploadTask is not a subclass or in any way related to AWSTask as a concept.
Let's start at the bottom. The transferUtility.uploadUsingMultiPart(...) method takes some parameters, two closures, and returns an AWSTask<AWSS3TransferUtilityMultiPartUploadTask>: an AWSTask that will asynchronously return an AWSS3TransferUtilityMultiPartUploadTask? or an Error? to the block provided to continueWith.
The moment of understanding I had was realizing that just creating an AWSS3TransferUtilityMultiPartUploadTask is an asynchronous, fallible operation, with an error case that must be handled. That is why we've defined taskQueuedHandler above.
Keep in mind that taskQueuedHandler may be called on a background queue.
completionHandler will always get called if the if let result = task.result code path in taskQueuedHandler executes. completionHandler still has to handle both success and failure cases.
If, for example, you start a UIActivityIndicatorView as loading before calling uploadUsingMultiPart, but you don't handle the task.continueWith error, it's possible that the UIActivityIndicatorView will spin forever.
Takeaway: If you're expecting the result of an upload or download at some point in the future, you need to handle the error case in task.continueWith.
AWSTask for get{*}Tasks
Since AWSS3TransferUtility maintains its own database of tasks, even across app cold launches, you may need to retrieve these tasks. This use case is shown in the API docs.
Note that even though these getter functions return an AWSTask, they're not asynchronous and the result is available immediately. There's also no way for the returned AWSTask to contain an error.
Takeaway: Sometimes the AWS SDKs return AWSTasks for synchronous operations. Sometimes they return AWSTasks for operations that are not fallible. However, be careful relying on this behavior because the underlying implementation could always be changed in a future version without your knowledge.
API SDK
Because AWSAppSyncClient in built on top of ApolloClient, some of the below points are applicable to Apollo GraphQL as well.
Offline Mutations
One of the marketing points of AppSync is that mutations (i.e. POST, PUT, or DELETE in the REST world) can be triggered by a user while they're offline, and the mutations will be queued in local storage and relayed to the server when the user's device has connectivity again.
This is a feature set available in certain types of apps, including many of Apple's own stock apps like Reminders or Contacts.
However, this behavior does not always make sense for all types of mutations. Even when it does make sense, it often comes with an additional heavy burden of proper UX design. Handling errors. Handling conflicts. These are problems that even the most mature apps still struggle with.
In our app, we have a pretty straightforward createUser mutation (i.e. sign up). createUser is a particularly poor candidate for offline mutation support:
It has several server-side validation rules for form elements (e.g. unique username).
The app is logically partitioned to only allow registered users to access certain parts of the app.
Before learning that offline mutations were the default in AppSync and could not be turned off, I was struggling to understand why when simulating network errors, the completion block to my mutation was never getting called, even beyond the timeout duration.
When I realized this behavior was intentional, it took more time to figure out a workaround that didn't require the huge maintenance burden of subclassing or implementing manual timeout code throughout the app.
It turns out the workaround is as simple as using the underlying appSyncClient.apolloClient instance.
From my reading of the AWSAppSyncClient source, it's safe to force unwrap apolloClient at the moment. But certainly use caution in your particular use case.
With the above code, mutations attempted while offline will fail with an error after the default timeout (60 seconds) and call the completion block.
Takeaway: Use appSyncClient's underlying apolloClient directly to perform mutations that shouldn't be queued offline.
Errors
Overall, GraphQL is a welcome addition of structure compared to REST. However, I've found the error story to be a little disappointing.
When writing my first AppSync API request handler, I soon found the control flow for errors to be a little overwhelming. All layers of the stack have their own set of errors, and Swift's untyped errors don't help the situation.
Let's look at an example fetch request. I've set up and documented the completion handler.
appSyncClient.fetch(query:query) { (result:GraphQLResult<Query.Data>?, error:Error?) in// 1ifletnetworkError= error as? AWSAppSyncClientError {
// The first layer of error handling is a network stack error.// 2
} elseifletunknownError= error {
// This case probably shouldn't happen, but I don't know the network stack// well enough to guarantee that.// 3
} elseifletdata= result?.data? {
// This is sort of the happy path. We got the data we requested.// However, `result?.errors?` may still contain errors!// It depends on your use case whether you want to ignore them if// `data` is non-null.// 4
} elseifletgraphQLErrors= result?.errors?, !graphQLErrors.isEmpty {
// According to the GraphQL spec, graphQLErrors will be a non-empty list.// These errors are also more or less untyped.// 5
} else {
// Although logically we should have covered all the cases,// the compiler can't statically guarantee we have so we should throw// an `unknown` error from here.
}
}
The network stack is provided by AWSAppSyncHTTPNetworkTransport and throws AWSAppSyncClientError. In the .requestFailed case, the Cocoa error can be extracted and the localizedDescription shown to the user. The other cases probably aren't that useful. Note that although AWSAppSyncClientError conforms to LocalizedError, the error messages are English only and usually add various codes that would probably be unideal to show users.
I haven't dug through the network stack enough to know whether there are other error types that can be thrown, but the presence of an error at this level of the stack probably means that result will be nil.
The GraphQL spec says that result can contain both data and errors. It's up to you to determine whether you need to handle this case, and if so, how to handle it. For many use cases though, getting data means success.
The GraphQL spec defines an error as a map with a message that's intended for developers, and optionally locations and path fields. As of the June 2018 spec, user fields should be contained within the extensions field. However, the AppSync spec was based on the October 2016 GraphQL spec, and therefore defines an errorType field in the root of the error map. errorType is a String type which makes it more readable to developers, but also more error prone.
All those nullable fields have left us with an else case.
I really wish errors were typed in GraphQL (and Swift too!).
Takeaway: Handling the results of a fetch or perform requires some knowledge about the various layers of the network stack. Make sure you've considered the possible errors at each layer and how can you help your user recover from them.
Equatable structs
The codegen utility included in AWS Amplify and part of Apollo's tooling does not support generating structs that conform to Equatable. Generated enums do conform to Equatable.
The way structs are laid out, all the struct's data is stored in a dictionary [String: Any?] (typealiased as Snapshot). Its typed properties are decoded from or encoded into that dictionary on the fly in a property's getter and setter, respectively.
Equatable could probably be generated the old fashioned way by comparing all properties. I'm unsure of whether this could introduce performance problems for deeply nested structs due to the lazy (and non-cached) decoding.
This was discussed in a (now closed) GitHub issue.
Takeaway: Code generated enums conform to Equatable. Code generated structs do not conform to Equatable. If you need Equatable structs, you'll have to write the == function yourself manually, generate it with a tool like Sourcery, or create wrapper structs.
Query watching
AWSAppSyncClient has a useful watch feature that allows you to receive updates to any resources fetched by the query you're watching throughout the lifetime of the watch. Experimenting with this feature, I've found a few conceptual points to keep in mind.
watch works by first adding a subscription to any changes to the store. Next, it makes a normal fetch with the same configurable cache policy options available to fetch. The results of this initial fetch are used to create a list of dependentKeys. When the cache notifies the GraphQLQueryWatcher that its contents have changed, the GraphQLQueryWatcher checks if any of the changed keys are contained in its dependentKeys, and if so, it fetches the query again (with cache policy .returnCacheDataElseFetch) then calls the closure registered in watch with the result.
Set up the cache key identifier on your store
As stated in the docs, you have to tell apolloClient how you uniquely identify your resources:
// Use something other than "id" if your GraphQL type is different
appSyncClient?.apolloClient?.cacheKeyForObject = { $0["id"] }
In their example, it says that a Post with id = 1 would be cached as Post:1. However, in my testing, only the id itself is used (i.e. 1). Currently, we have ids that are unique across our resources, but if you don't, you may need to investigate this more to ensure you don't have key collisions in the cache.
A fetch must succeed before watching will work
Since dependentKeys are derived from the results of the first fetch (and is regenerated on subsequent fetches), this fetch has to be successful in order for the watch to respond to changes produced by other queries.
If you use watch, you have to allow your user to retry in case the initial fetch fails. Call GraphQLQueryWatcher.refetch(). Even if the same query is fetched from a different part of your app, this query must succeed at least once in order to receive changes.
Use a pessimistic cache policy
You essentially cannot (safely) use the .returnCacheDataDontFetch cache policy with watch.
Granted, it's rare case to want to do so. But if you thought that the partial results from a different query in your app could be picked up by a watch query, this won't work. It has to be the exact same query and it has to have been fetched before with the exact same parameters from the server.
If you used .returnCacheDataDontFetch as the cache policy and the fetch resulted in a cache miss, you would have to call refetch() anyway to make a fetch to the server.
It's not straightforward to use watch with paging queries
It's common in GraphQL to use a Connection type to implement indefinite paging.
Let's look at the following GraphQL schema:
type MovieConnection {
  movies: [Movie!]! # contains a maximum of 10 items
  nextToken: String
}

type Query {
  getLatestMovies(nextToken: String): MovieConnection!
  getMovie(id: Int!): Movie!
}
For example, if you set up a watch for the first call to getLatestMovies(nextToken: nil), this watch will only respond to changes to the 10 Movie resources returned by the query. If you make a normal fetch request for the next page using nextToken, the watch you have set up will not observe changes in the Movie resources returned in the second request.
If you wanted to respond to changes to any Movie returned in any pages, you'd have to do a watch for each page and add the GraphQLQueryWatcher to a collection. The logic in your result handlers would depend heavily on how you structured your data source since the result could be an add or an update.
It's not possible to watch resources outside a query
It's probably obvious from the interface to watch since the first parameter is of type GraphQLQuery, but you cannot watch for changes to an arbitrary key in the cache. For example, if there was a resource in your database keyed by id 12345, you can't simply register a watcher with a dependent key for this id.
Any connection between resources and queries must be resolved by the server
If you have two different queries that you know reference the same object, that relationship must be codified by the server.
Continuing with the getLatestMovies example in the previous section, imagine we received a list of 10 Movies and wanted to watch for granular changes in the Movie with id = 12345.
To accomplish this you might think you could simply call:
let watcher = appSyncClient.watch(query: GetMovieQuery(id: 12345), cachePolicy: .returnCacheDataDontFetch, queue: .main, resultHandler: { (result, error) in ... }
But this would not work! It would result in a cache miss and the watch would be inert until refetch() was called.
Although the Movie returned by GetMovieQuery(id: 12345) is already in the cache, the association between the query itself and the Movie resource can't be resolved by AppSync/Apollo until the server returns the result for the query and this result is cached too.
Conclusion
In this post, I outlined some development points to watch out for in the Authentication, Storage, and API SDKs of AWS AppSync. I hope the takeaways from this post are valuable for current and future users of AWS AppSync.