Japanese Version: ElastiCache for Redisの新機能をためしてみた - クックパッド開発者ブログ
Hello! Hoshino(@con_mame) here, with the infrastructure team at COOKPAD.
We use AWS to run our services. Currently we are using Memcached and Redis for various kinds of caching. With an increased diversity of applications and access rate, however, the number of instances for these caching servers has also grown, increasing our administrative costs. In particular the number of instances on the Redis server has increased, so we have been considering replacing them with ElastiCache for Redis, the in-memory cache service offered by AWS.
Although ElastiCache for Redis restricts access to some management-related commands, it uses ordinal Redis as its engine, with versions 2.6.13 and 2.8.6 available to choose from.
Slaves can be created by defining replication groups, where each replication group is assigned an endpoint URL. A client can connect to the master node in the replication group by connecting to the endpoint (the endpoint is also used as an address in the replication).
A slave node can be promoted to master through use of the promoting feature. Other nodes then automatically become slaves of the new master. A slave node can be promoted with the following command:
$ aws elasticache modify-replication-group
  --replication-group-id Replication group ID
  --primary-cluster-id ID of node being promoted
  --apply-immediately
The replication is also reconfigured once this is complete.
It should be noted that the above promotion does not run automatically during master node failure, and that if the replication group holds a large volume of saved data, the master node performance may be impacted or the connection can fail in the worst case.
This is not an issue specific to ElastiCache; it is a common issue with Redis. At COOKPAD, we avoid this by reducing the volume of data that we save in a node.
Another thing to note is that each slave in the replication group is assigned an endpoint that can be used for read-only access.
In order to distribute read requests to slaves, it is necessary to use middleware such as haproxy or twemproxy or implement such logic on the application side.
Our company has implemented different solutions so far, including using ELB to distribute read requests across healthy slaves and implementing master failover with moving ENI according to health-check with Heartbeat. We also use Redis Sentinel on our other servers.
It would be great if ElastiCache itself supported automatic failover and had a unified endpoint shared among slaves, with loads well balanced automatically (ElastiCache cannot be attached to ELB.)
Regarding performance, we had previously conducted our own internal performance tests. When automated backup and restore features were released, however, we tried out these new features and have summarized our experiences below.
Backup and Restore
Although ElastiCache for Redis has always supported importing Redis DB files to make it easy to migrate since launch, a backup and restore feature has now been added to make it easier to recover from failure.
You can take snapshots either automatically or manually (You cannot use the backup feature with cache.t1.micro.) Because BGSAVE is issued when you take a snapshot (as mentioned in the developer documentation), there is a chance of performance degradation depending on the volume of stored data. In fact we benchmarked several times and observed some performance degradation with large data volumes.
Depending on your use case, we recommend running performance tests before using it in production. Otherwise I would suggest taking snapshots on a slave node that is not used in the service. (Note that this is a common tip for taking snapshot on Redis in general.)
Here as well, there is not much difference compared to operating self-managed Redis. We also ran a data update, setting operations at a high frequency, and confirmed that the data that was updated just when BGSAVE was issued was properly stored and recoverable.
With CLI you can take a snapshot by running the following command:
$ aws elasticache create-snapshot --cache-cluster-id hogecahce --snapshot-name hogesnapshot
In the Management Console, you can do this by clicking on “Backup,”

 Entering a name for the snapshot, and clicking “Yes, Create Snapshot.”
You can also specify a backup window when you create a cluster in the Launch Cache Cluster Wizard.
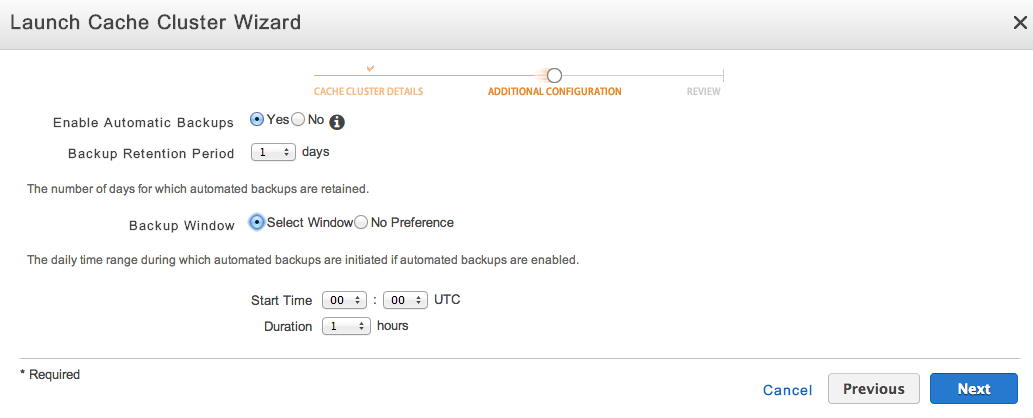
A snapshot is then taken automatically during the specified backup window.
You’ll need to configure at least one hour for the backup window.
When Snapshot runs, the MONITOR command outputs the following:
1399427528.007150 [0 127.0.0.1:34471] "set" "ElastiCacheMasterReplicationTimestamp" "2014-05-07T01:52:08.006Z" 1399427529.003567 [0 127.0.0.1:34471] "bgsave" 1399427529.022860 [0 127.0.0.1:34472] "ping"
As you can see, it simply runs bgsave.
It took about 10-15 minutes for the snapshot to be completed with a cache.m1.medium with approx. 1 GB of data.
With Redis running its own operations, it takes one or two minutes to complete, so we felt it takes longer. It is because it includes time to transfer the snapshot to Amazon S3. Moreover, we confirmed it does not cause any data corruption even if there is really a large amount of access when taking snapshots.
Since restoring from a backup is the same as creating a new cluster, the following command will do the job:
$ aws elasticache create-cache-cluster --cache-cluster-id newcluster --snapshot-name hogesnapshot --cache-node-type cache.m1.medium
(The Redis version cannot be changed.)
One thing to note here is that a snapshot only contains the data and node type that were used when the snapshot was taken. The Security Group and Replication Group configurations are not automatically inherited to the new cluster created from a snapshot.
For this reason, should something fail and you want to restore from a snapshot, you’ll need to restore a master node with a different name, create a new Replication Group and apply the Security Group.
In my opinion, it would be easier and faster to recover from failure if a snapshot contained the replication group and security group configurations in its metadata. Currently, you need to write a script to automate the process.
The biggest issue for now is that a new endpoint URL is assigned for a newly launched cluster, so you will need to change the application configuration. I think it would be more convenient if it supported functionality to rename the existing endpoint. As a workaround you could define an alias for the endpoint with CNAME in a DNS server, such as Route53, to handle changes in the endpoint by updating the DNS record, but this is not a smart solution.
Another important thing to note is that even though Redis allocates memory when it forks a child process, such as for BGSAVE, this is not included in Redis’s maxmemory, potentially causing memory swaps and resulting in a significant degradation in performance.
To prevent this situation, ElastiCache has a parameter in the Parameter Group called reserved- memory. ElastiCache for Redis keeps the amount of memory specified with this parameter unused. This parameter should be configured appropriately according to your use case. There is no configured default limit.
Summary
This is a brief summary of some of the new features in ElastiCache for Redis.
Although ElastiCache for Redis is a fully managed service, compared to the other AWS services, I felt it was almost the same as operating vanilla Redis. It’s a good service for reducing costs when managing automatic snapshots and hosts.
Although we have started to use ElastiCache for Redis, we have a use case where we need to control timing for maintenance. Thus we leave that part on EC2 at this moment of writing because ElastiCache needs to specify a maintenance window of 30 minutes. The window is not often used for actual maintenance, but this needs to be handled carefully for the particular use case. As more features are added, however, the benefits of migrating will be greater. I think we will then consider fully migrating our Redis workload.
References
A speakerdeck I presented in a study session is available here: https://speakerdeck.com/con_mame/elasticache-for-redis-snapshot
Documentation: http://docs.aws.amazon.com/AmazonElastiCache/latest/APIReference/Welcome.html

