クックパッドの事業開発部でiOSエンジニアをしている角田(id:muchan611)です。普段はクックパッドiOSアプリの検索に関する機能を開発しています。
クックパッドの基本的な機能のひとつである「つくれぽ」を表示する「つくれぽ詳細画面」を、UICollectionViewCompositionalLayoutやUICollectionViewDiffableDataSourceを使って実装したので、その過程や実装方針についてご紹介します。
背景
つくれぽとは、クックパッドのレシピを見て料理をした人が、その料理を他の人におすすめするために投稿するもので、検索ユーザーはつくれぽ通してレシピを探せるようになっています。
事業開発部では「つくれぽからレシピを決める」体験を増やす取組みを行っていますが、各施策の方針を決定するために、多くのユーザーインタビュー(※)や数値分析を実施し判断材料を得ています。
そのインタビューの中で「レシピを決定するには材料情報が必要だが、つくれぽ詳細画面にはそれが表示されておらず、レシピ決定の障壁になっている可能性がある」という課題が明らかとなり、つくれぽ詳細画面に材料を表示する施策が決まりました。
今回の開発では、これまでの実装を拡張するのではなく、CollectionViewを用いて画面を作り替えることとなったため、その際に得た知見や実装方針について、ひとつの例としてご紹介できればと思います。
課題と実装方針
実はiOSクックパッドでは、2020年の春に大きなリニューアルを実施し、その際につくれぽ詳細画面を大きく変更しました。
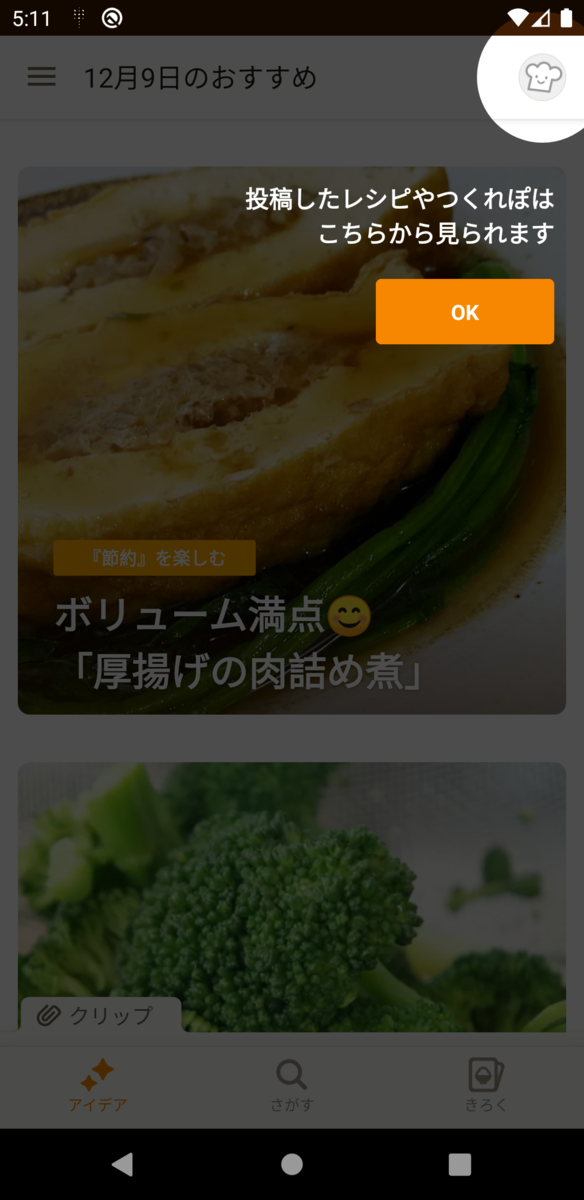
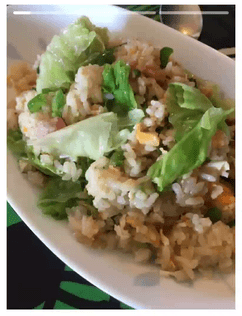
ただ、この時に実装されたつくれぽ詳細画面では、コンテンツが追加されることを想定していなかったため、スクロールができない画面となっていました。変更前後のつくれぽ詳細画面は以下のような見た目で、以前はViewControllerの上に直接各パーツが配置されていました。
以前のつくれぽ詳細画面

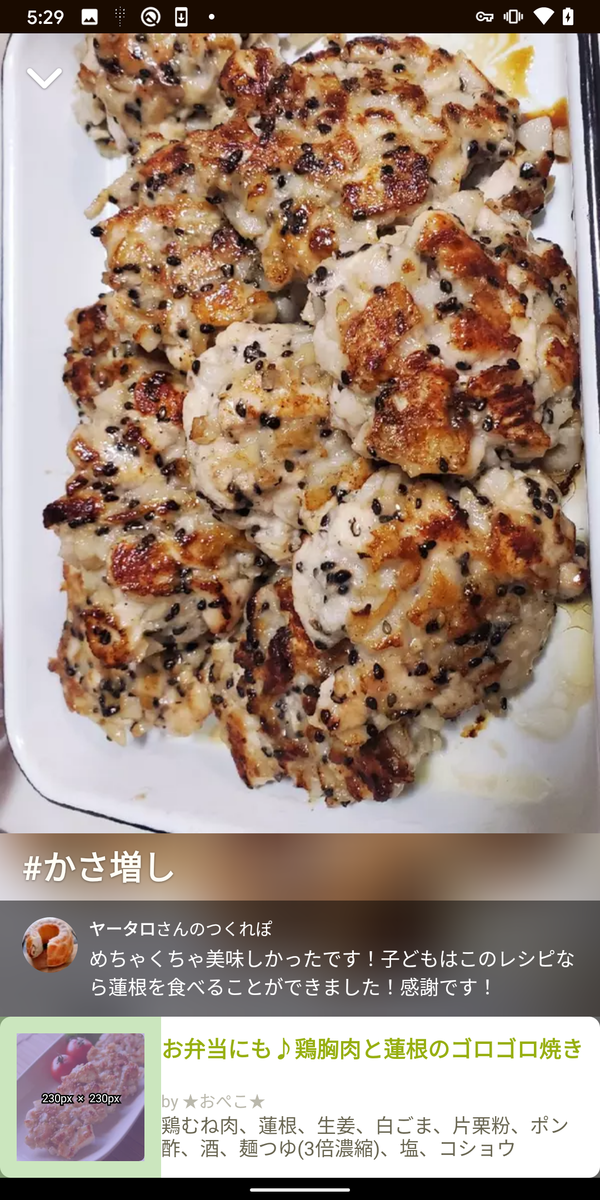
新しいつくれぽ詳細画面


そして、今回材料コンテンツを実装するにあたって、以下の問題をクリアする必要がありました。
- スクロールしないことを前提にした制約が多く、そのまま構造を変えずに実装を進めると、非常に複雑でメンテナンスしにくい状態になりかねない
- 今後、材料以外にもレシピ決定に必要なコンテンツを追加していく可能性が高く、継続的にコンテンツを増やせるような構造にする必要がある
このような背景を踏まえて今後の継続的な開発を検討した結果、 UICollectionViewで画面を作り替えUICollectionViewCompositionalLayoutとUICollectionViewDiffableDataSourceを利用する方針で開発を進めることにしました。主な理由は以下の通りです。
- コンテンツの追加が容易に行える
- 前述した通り、今後もレシピ決定に必要なコンテンツを追加する可能性があり、レイアウトの変更に強くシンプルで分かりやすい実装が実現できるCollectionViewが最適だった
UICollectionViewCompositionalLayoutを利用することで、section毎のカラム数指定や各コンテンツのサイズ指定が柔軟で容易になる- 例えば、材料sectionは2カラム、それ以外は1カラムで表示するといった、文字数によるコンテンツの高さ計算を自前で行う必要がなく、それらの調整をAutoLayoutに任せることが可能
UICollectionViewDiffableDataSourceを利用することで、データへのアクセスも容易で安全になる- 表示データをインスタンス変数に保持して利用するケースと比較すると、
UICollectionViewDiffableDataSourceを利用することでデータの保持をフレームワーク側に任せることができ実装が簡素化できる - 型による制約が強いため、データとUIの不整合を防止できる
- 表示データをインスタンス変数に保持して利用するケースと比較すると、
実装内容
全てのコードを載せると全体が分かりにくくなってしまうため、一部割愛しながら実装内容についてご紹介します。
DataSourceの定義
まずdataSourceですが、以下のような定義になっています。
var dataSource: UICollectionViewDiffableDataSource<Section, Item>!
SectionIdentifierTypeにはSectionを、ItemIdentifierTypeにはItemというenumを指定しています。
それぞれのenumの定義は以下の通りです。(TsukurepoViewItemは、APIから取得したつくれぽ情報をViewにとって都合の良い形に変換した構造体です)
enum Section: CaseIterable {
    case media
    case margin
    case recipeTitle
    case recipeDescription
    case ingredientsHeader
    case ingredients
    case showMore
}

enum Item: Hashable {
    case media(media: TsukurepoViewItem.Media?, tsukurepo: TsukurepoViewItem.Tsukurepo?)
    case margin
    case recipeTitle(TsukurepoViewItem.RecipeOverview?)
    case recipeDescription(String)
    case ingredientsHeader
    case ingredients(TsukurepoViewItem.Ingredients)
    case showMore
}
このように分けた背景についてですが、まず、UICollectionViewCompositionalLayoutでは、section毎にレイアウトを組む仕組みになっているため、Sectionはレイアウト単位で分けることにしました。
そして、Itemはcell単位で分けており、cellに渡したいデータをenumのassociated valueで持つようにしています。
UICollectionViewDiffableDataSourceの初期化時に指定するcellProvider内で、各cellの更新処理を実装するため、その際に必要なデータへ簡単にアクセスできるようにするためです。
dataSource = UICollectionViewDiffableDataSource<Section, Item>(collectionView: collectionView) { [weak self] (collectionView: UICollectionView, indexPath: IndexPath, identifier: Item) -> UICollectionViewCell? in
    guard let self = self else { return nil }
    switch identifier {
    case let .media(media, tsukurepo):
        let cell = collectionView.dequeue(TsukurepoDetailsMediaCell.self, for: indexPath)
        cell.configure(media: media, tsukurepo: tsukurepo)
        cell.delegate = self
        return cell
        //..以下省略..
    }
}
dataSourceへsnapshotをapplyする処理は、下記のapply(tsukurepo: TsukurepoViewItem?)内で実装しており、この関数はviewDidLoad()内やつくれぽ情報の取得が完了した際に呼びだされます。
override func viewDidLoad() {
  super.viewDidLoad()
  //..途中省略..

  apply(tsukurepo: nil)

  presenter.tsukurepo
    .drive(onNext: { [weak self] tsukurepo in
        self?.apply(tsukurepo: tsukurepo)
    })
    .disposed(by: disposeBag)
}
viewDidLoad()が呼び出された時点では、まだつくれぽ情報を取得していないので、引数のtsukurepoがnilとなります。その場合は、media margin recipeTitleのItemIdentifierTypeのみを追加し、それぞれのcellではempty viewを表示するように実装しています。
つくれぽ情報取得後は全てのsectionにItemIdentifierTypeを追加し、材料については存在する材料の数だけingredientsを追加します。
func apply(tsukurepo: TsukurepoViewItem?) {
    var snapshot = NSDiffableDataSourceSnapshot<Section, Item>()
    snapshot.appendSections(Section.allCases)

    snapshot.appendItems([.media(media: tsukurepo?.media, tsukurepo: tsukurepo?.tsukurepo)], toSection: .media)
    snapshot.appendItems([.margin], toSection: .margin)
    snapshot.appendItems([.recipeTitle(tsukurepo?.recipeOverview)], toSection: .recipeTitle)
    if let tsukurepo = tsukurepo {
        if let description = tsukurepo.recipeOverview.description {
            snapshot.appendItems([.recipeDescription(description)], toSection: .recipeDescription)
        }
        snapshot.appendItems([.ingredientsHeader], toSection: .ingredientsHeader)
        let ingredients: [Item] = tsukurepo.ingredients.map { .ingredients($0) }
        snapshot.appendItems(ingredients, toSection: .ingredients)
        snapshot.appendItems([.showMore], toSection: .showMore)
    }

    dataSource.apply(snapshot, animatingDifferences: false)
}
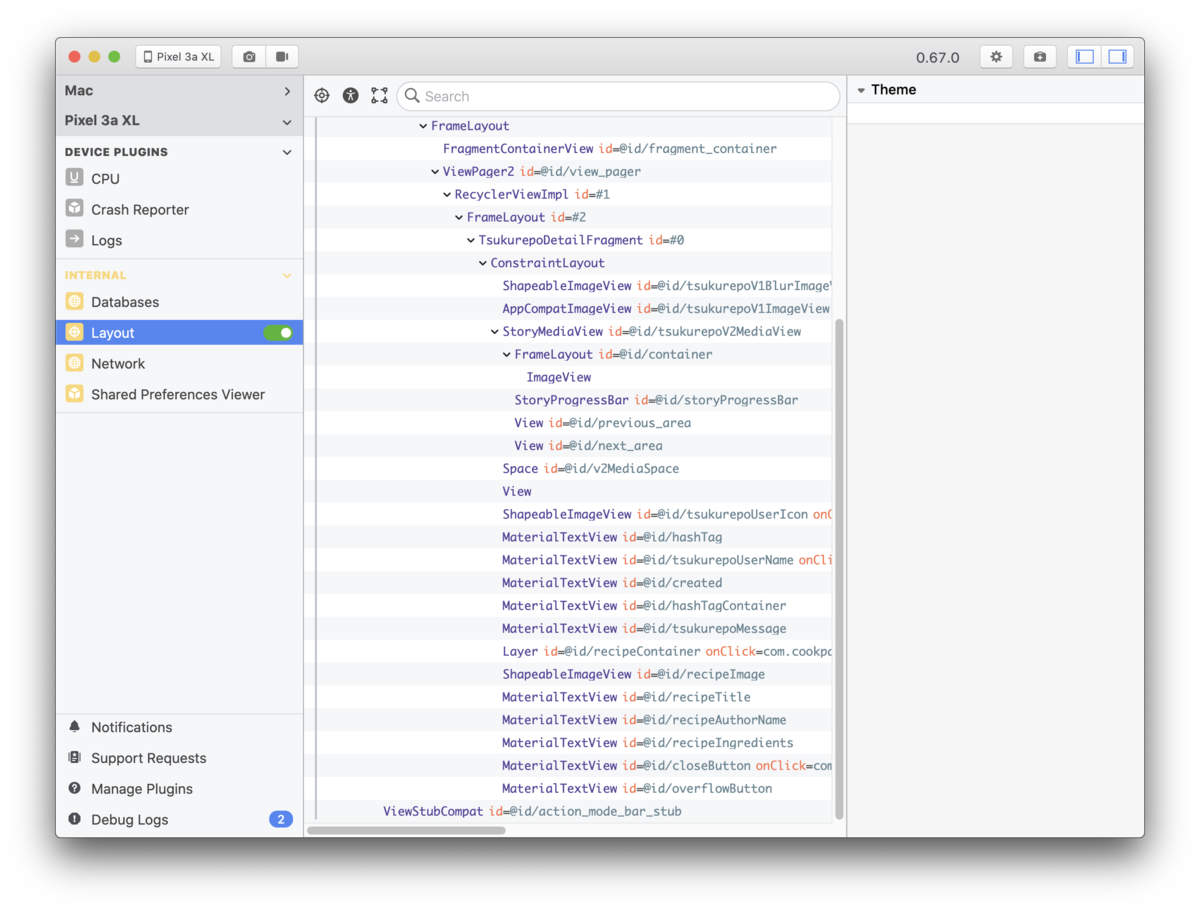
レイアウトの生成
つくれぽ詳細画面の構造を簡略化するとこのようになります。(2枚目はスクロール後です)


これを実現しているコードは下記の通りですが、section毎にコンテンツの高さを割合や絶対値、推定値で指定しています。
例えば、mediaはつくれぽ画像を含むsectionで、仕様上縦横比が3:4になるように表示したいのですが、この場合はgroupのサイズに次のような指定をします。
let groupSize = NSCollectionLayoutize(widthDimension: .fractionalWidth(1.0),
                                       heightDimension: .fractionalWidth(1.33))
let group = NSCollectionLayoutGroup.horizontal(Layoutize: groupSize, subitem: item, count: 1)
.fractionalWidthや.fractionalHeight を指定することで、幅や高さに対する割合でコンテンツのサイズを決めることができるためです。また、説明文や材料などは文字数によって高さを可変にしたり、文字サイズ変更の際に適切な高さを適用したりするため、.estimatedを指定しています。そうすることで、コンテンツサイズが変更される時にシステム側で実際の値を計算し調整してくれます。また、最下部に表示する「このレシピを詳しく見る」ボタンの高さは固定にしたいため、絶対値で指定ができる.absoluteを利用しています。
これらのDimensionについては公式ドキュメントに詳細が記載されています。
let layout = UICollectionViewCompositionalLayout { [weak self] (sectionIndex: Int, _: NSCollectionLayoutEnvironment) -> NSCollectionLayoutection? in
    guard let self = self else { return nil }
    let sectionKind = self.dataSource.snapshot().sectionIdentifiers[sectionIndex]

    let itemHeight: NSCollectionLayoutDimension
    let groupHeight: NSCollectionLayoutDimension
    switch sectionKind {
    case .media:
        itemHeight = .fractionalHeight(1.0)
        groupHeight = .fractionalWidth(1.33)
    case .margin:
        itemHeight = .fractionalHeight(1.0)
        groupHeight = .fractionalHeight(0.03)
    case .recipeTitle:
        itemHeight = .fractionalHeight(1.0)
        groupHeight = .fractionalHeight(0.15)
    case .recipeDescription:
        let height = NSCollectionLayoutDimension.estimated(72)
        itemHeight = height
        groupHeight = height
    case .ingredientsHeader:
        let height = NSCollectionLayoutDimension.estimated(40)
        itemHeight = height
        groupHeight = height
    case .ingredients:
        let height = NSCollectionLayoutDimension.estimated(35)
        itemHeight = height
        groupHeight = height
    case .showMore:
        itemHeight = .fractionalHeight(1.0)
        groupHeight = .absolute(108)
    }

    let itemSize = NSCollectionLayoutize(widthDimension: .fractionalWidth(1.0),
                                          heightDimension: itemHeight)
    let item = NSCollectionLayoutItem(Layoutize: itemSize)
    let groupSize = NSCollectionLayoutize(widthDimension: .fractionalWidth(1.0),
                                           heightDimension: groupHeight)
    let group = NSCollectionLayoutGroup.horizontal(Layoutize: groupSize, subitem: item, count: sectionKind.columnCount)

    return NSCollectionLayoutection(group: group)
}
そして、材料のsectionでは1行に2つのitemを表示したいため、countを指定することでsectionによって表示するitemの数を変えています。
sectionKind.columnCountは、材料sectionの場合に2、それ以外は1を返します。
let group = NSCollectionLayoutGroup.horizontal(Layoutize: groupSize, subitem: item, count: sectionKind.columnCount)
このようにUICollectionViewCompositionalLayoutを使う事で、カラム数を変えたりコンテンツサイズを柔軟に指定したりすることができ、複雑なレイアウトもシンプルで簡単に実現することができます。
iOS12以下のサポートについて
UICollectionViewCompositionalLayoutやUICollectionViewDiffableDataSourceはiOS12以下で利用できないため、iOS12以下で同じような実装を実現したい場合はIBPCollectionViewCompositionalLayoutやDiffableDataSourcesなどのバックポートライブラリを使用する必要があります。
クックパッドでも、主要な画面においては、iOS12で表示できるようにこれらのバックポートライブラリを利用するケースがありました。しかし、公式の仕組みとの挙動の違いから少なからずサポートコストがかかっていたため、今回はiOS13以上の端末でのみ新しいつくれぽ詳細画面を表示しiOS12以下をサポートしない、という事業判断を行いました。
(本実装を行った2020年11月時点において、クックパッドアプリではiOS12をサポートしていましたが、現在はサポート対象をiOS13.1以上に引き上げています)
まとめ
ここまでに述べたように、UICollectionViewCompositionalLayoutを用いることでsection毎のカラム数指定や各コンテンツのサイズ指定を柔軟で容易に行えるため、レイアウトの実装がシンプルかつ比較的簡単になります。また、UICollectionViewDiffableDataSourceを利用する事で、データの保持をフレームワーク側に任せることができ実装が簡素化できるほか、データとUIの不整合の防止にも繋がるため、より安全な実装が実現できます。
そして、これらの仕組みを利用してつくれぽ詳細画面を作り替えることで、新しいコンテンツの追加が容易となり、スムーズに追加開発を進められる状況になっています。
施策の結果については、(レシピ決定のひとつの指標である、つくれぽ詳細から遷移したレシピ画面での)クリップ率上昇やつくれぽ一覧画面の3日以内再訪率が上昇したことが分かり、「つくれぽからレシピを決める」体験を増やすことができたと評価しています。
このように、クックパッドではユーザーインタビューや数値分析を通して施策を考え開発を進めており、一緒にサービス開発を盛り上げてくれるiOSエンジニアを大募集しております!!
カジュアル面談なども実施しておりますので、少しでもご興味がある方はぜひお気軽にお問い合わせください!
https://info.cookpad.com/careers/
※現在、ユーザーインタビューはオンラインで実施しています