iOS画像非同期取得

こんにちは、モバイル基盤のヴァンサン(@vincentisambart)です。

半年くらい前に、iOSクックパッドアプリで画像非同期取得を自作することになりました。導入してから何ヶ月も問題なく動いているので、どう動いているのか紹介しようと思います。でもその前に自作することになった経緯を説明しましょう。

自作経緯

長年画像非同期取得に既存のライブラリを使っていましたが、昨年ライブラリの不具合で画像の取得が稀に失敗していたバグがいくつかありました。バグが修正されて、その数ヶ月後にまた似た問題。

この状態が好ましくなかったので、以下の選択肢のどれかにしようと議論しました。

  • 使っているライブラリのメンテナンスにもっと直接参加する
    • コードが古くメンテナンスしやすくなさそうでした。
  • 使っているライブラリのバージョンを固定する
    • 自動的に更新をやめても、バグ修正や最新のOSの対応のために定期的に更新した方が良いでしょう。
  • 別のライブラリにするか
    • 選定が難しいでしょう。例えばアプリをリリースしないとライブラリの安定性が判断しづらいです。
  • 自作するか

ライブラリを使っていたものの、複雑な機能は使っていませんでした。必要だったのは画像のダウンロード、キャッシュ、WebP対応、くらいです。

クックパッドでモバイルアプリの画像はWebPを使っているので、画像取得を自作することになっても、WebP読み込みにライブラリが必要だと思っていました。でも議論中に、iOS 14以降UIImageがWebPを読み込めるのが発覚しました。その時点で最新のiOSクックパッドアプリの最小サポートバージョンはすでにiOS 15でした。

画像ダウンロードとキャッシュだけが必要なら自作してみても良いかもという結論になりました。

実装

経緯の次は実装の詳細を説明しようと思います。その中で、まずは一番複雑そうなキャッシュの実装はどうしましょうか。

キャッシュ

多くの画像非同期取得ライブラリがキャッシュを2段階で行います:

  • 取得された画像ファイルをディスクにキャッシュします。アプリを再起動してもデータは残ります(ただし端末に空き容量が足りなくなった場合、OSが一部を消すことがあります)。
  • 画像ファイルが読み込まれたUIImageをメモリ上にキャッシュします。もちろんアプリを再起動したら一掃されます。ディスクからのファイル読み込みも、画像データのデコードも、メインスレッドでやらない方が良いことですが、UIImageをメモリ上でキャッシュするとどっちも必要ないのでこのキャッシュは直接メインスレッドで扱えます。

どちらのキャッシュの種類もできれば自分で実装したくありません。ディスクやメモリの空き容量、キャッシュの使っている容量、を気にする必要があるのはややこしそうです。でも実はFoundationにそのためのツールがあります。

ダウンロードされるデータをキャッシュするためにURLCacheがあります。ダウンロードに使うURLSessionconfigurationに代入するだけでダウンロードするデータがキャッシュされるようになります。

メモリ上でデータをキャッシュするためにNSCacheがあります。使い方がDictionaryに近いです。キーと値がAnyObjectであるべきなのでSwiftから使う場合少し不便な場面もありますが、今回キー(URL)をNSURLに簡単にキャストできるので、別のものにラップせずにAnyOjectにできます。

API

キャッシュのためのツールが揃ったので、画像取得APIを見てみましょう。

enum LoadingImage {
    case cached(UIImage)
    case inProgress(Task<UIImage, any Error>)
}

final class ImageLoader {
    func loadImage(from imageURL: URL) -> LoadingImage {

Taskが見られるのでSwift Concurrencyが使われているのですが、asyncメソッドではありません。

ビューの読み込みや表示時にOSから呼ばれるメソッド(collectionView(_:cellForItemAt:)viewDidLoad、など)は基本的にasyncではありません。

loadImageの定義がfunc loadImage(from imageURL: URL) async throws -> UIImageでしたら、asyncでないメソッドから呼ぶと新規タスクを作成する必要があります。

func viewDidLoad() {
    Task { @MainActor in
        // このコードが`viewDidLoad`のタイミングで実行されるのではなく、
        // `MainActor`が次回実行するようにキューされます。
        let image = await imageLoader.loadImage(from: imageURL)
        imageView.image = image
    }
}

loadImage内でawaitをせずにreturnしたとしても、同じMainActorで実行される別のタスク内なので、viewDidLoadの後に実行されてしまいます。画像がメモリ上のキャッシュにあったとしても、ビューの最初に描写で画像が表示されない可能性があります。最初の描写で画像なし、次の描写で画像あり、はチカチカして雑に見えます。フェードインを使えば少しマシですが、すぐ表示できればしたいです。

loadImage

本来のloadImageのコードを見てみましょう。

final class ImageLoader {
    func loadImage(from imageURL: URL) -> LoadingImage {
        // 画像がメモリ上キャッシュに入っていれば、すぐ返します。
        if let image = cachedImage(for: imageURL) {
            return .cached(image)
        }

        // バックグラウンドタスクで取得とデコードを行います。
        // `detached`を使うのはactorを引き継がないためです。
        return .inProgress(Task.detached {
            let request = URLRequest(url: imageURL)

            // コードの分かりやすさのために画像が`URLCache`に入っているのかどうか区別していませんが、
            // 必要であれば`urlCache.cachedResponse(for: request)`で入っているかどうか確認できます。

            let data = try await self.loadData(for: request)
            return try self.decode(data, for: imageURL)
        })
    }

ダウンロードをキャンセルしたければ、inProgress()に入ったタスクのcancel()メソッドを呼びます。Task.init()や今回のようにTask.detached()を使うとstructured concurrencyではないので、loadImage(from:)の戻り値を放置してもタスクがキャンセルされることはありません。

上記に使われているcachedImage(for:)NSCacheのメソッドを呼ぶだけです。URLAnyObjectではないので、NSCacheのキーに使うにはNSURLにキャストする必要があります。

final class ImageLoader {
    private let memoryCache = NSCache<NSURL, UIImage>()

    func cachedImage(for imageURL: URL) -> UIImage? {
        memoryCache.object(forKey: imageURL as NSURL)
    }

loadData(for:)に関しては、URLSession.data(for:)をもう少し使いやすくするだけです。

final class ImageLoader {
    private let session: URLSession
    private func loadData(for request: URLRequest) async throws -> Data {
        do {
            return try await session.data(for: request).0
        } catch {
            // タスクがキャンセルされた時、`session.data(for:)`がCocoaのエラーを発生されるのですが、
            // Swiftでは`CancellationError`がもっと自然だと思います。
            // タスクがキャンセルされている場合`CancellationError`を発生させる`try Task.checkCancellation()`がちょうど良いです。
            try Task.checkCancellation()
            throw error
        }
    }

decode(_:for:)UIImage(data:)をラップして、デコードされた画像をNSCacheに入れてくれるだけです。

final class ImageLoader {
    private func decode(_ data: Data, for imageURL: URL) throws -> UIImage {
        if let image = UIImage(data: data) {
            memoryCache.setObject(image, forKey: imageURL as NSURL)
            return image
        } else {
            throw InvalidImageDataError(url: imageURL)
        }
    }

ImageLoaderの全コードをこの記事の一番下にまとめました。上記になかったinitも含まれています。

使い方

上記に実装したAPIは基本的に以下のように使えば良いのではないでしょうか。

// 以前行われた取得が終わっていなければキャンセルします。
// キャンセルされる可能性ないなら、`loadTask`インスタンス変数は要らないでしょう。
if let loadTask {
    loadTask.cancel()
    self.loadTask = nil
}

// 取得を始めます。
switch imageLoader.loadImage(from: imageURL) {
case let .cached(image):
    // `image`をそのまま表示できます。

case let .inProgress(loadTask):
    // キャンセルできるために`loadTask`をとっておきます。
    self.loadTask = loadTask
    Task { @MainActor [weak self] in
        do {
            let image = try await loadTask.value
            // 無事に画像を取得できたので表示できます。
        } catch is CancellationError {
            // 待ち合わせていた`loadTask`がキャンセルされたので何もやるべきではありません。
        } catch {
            // 取得が失敗したので、placeholderを表示することが多いです。
        }
    }
}

移行

iOSクックパッドアプリで以前使っていたライブラリから自作ImageLoaderへの移行が割とスムーズでした。モジュール化によって画像読み込みが抽象化されていた場面多かったですし、ほとんどの画像が限られた数のビューに表示されています。

画像取得がまだ抽象化されていなかったら、まず抽象化するか、新しい実装の上に以前のに近いAPIを用意するか、の2択ですかね。前者は抽象化が終わったら移行するけど、後者は新しいコードに移行してから以前のAPIの利用を少しずつ減らします。

最後に

iOSの既存のツールを使えば、シンプルな画像取得は割とシュッと実装できました。だからといって画像取得を自作した方が良いわけでもありません。アプリによって状況が違います。自作したら自分でメンテナンスする必要がありますし、必要になった機能も自分で実装します。

自作するかどうか関係なく、画像取得が抽象化されていると、別のライブラリに移行しやすいので、いま直接ライブラリを使っていていて変える可能性があれば、とりあえず抽象化しても良いかもしれません。

この記事のコードを元に自作するのでしたら、機能の追加が必要かもしれません。ここで紹介されていませんが、iOSクックパッドアプリでは、画像をprefetchする仕組みや、メモリ上キャッシュになかった画像を表示にフェードインで表示させるFadeInImageView(UIKit版)とFadeInImage(SwiftUI版)があります。

// This project is licensed under the MIT No Attribution license.
// 
// Copyright (c) 2023 Cookpad Inc.
// 
// Permission is hereby granted, free of charge, to any person obtaining a copy
// of this software and associated documentation files (the "Software"), to deal
// in the Software without restriction, including without limitation the rights
// to use, copy, modify, merge, publish, distribute, sublicense, and/or sell
// copies of the Software, and to permit persons to whom the Software is
// furnished to do so.
//
// THE SOFTWARE IS PROVIDED "AS IS", WITHOUT WARRANTY OF ANY KIND, EXPRESS OR
// IMPLIED, INCLUDING BUT NOT LIMITED TO THE WARRANTIES OF MERCHANTABILITY,
// FITNESS FOR A PARTICULAR PURPOSE AND NONINFRINGEMENT. IN NO EVENT SHALL THE
// AUTHORS OR COPYRIGHT HOLDERS BE LIABLE FOR ANY CLAIM, DAMAGES OR OTHER
// LIABILITY, WHETHER IN AN ACTION OF CONTRACT, TORT OR OTHERWISE, ARISING FROM,
// OUT OF OR IN CONNECTION WITH THE SOFTWARE OR THE USE OR OTHER DEALINGS IN THE
// SOFTWARE.

import Foundation
import UIKit

public enum LoadingImage {
    case cached(UIImage)
    case inProgress(Task<UIImage, any Error>)
}

public struct InvalidImageDataError: Error {
    public var url: URL
    public init(url: URL) {
        self.url = url
    }
}

public final class ImageLoader {
    private let session: URLSession
    private let memoryCache = NSCache<NSURL, UIImage>()

    public init() {
        let configuration = URLSessionConfiguration.default
        let cacheDirectoryURL: URL?
        do {
            let systemCacheURL = try FileManager.default.url(for: .cachesDirectory, in: .userDomainMask, appropriateFor: nil, create: true)
            cacheDirectoryURL = systemCacheURL.appendingPathComponent("CookpadImageLoader", isDirectory: true)
        } catch {
            assertionFailure("Could not create cache path: \(error)")
            cacheDirectoryURL = nil
        }
        // デフォルトでは`URLCache.shared`が使われますが、もう少しディスク容量を使える画像専用のを使います。
        configuration.urlCache = URLCache(
            // `memoryCapacity`は試した限り0でも問題なく動きそうですが、一応念の為少しのメモリを割り当てます。
            memoryCapacity: URLCache.shared.memoryCapacity,
            diskCapacity: URLCache.shared.diskCapacity * 4,
            directory: cacheDirectoryURL
        )
        session = .init(configuration: configuration)
    }

    public func cachedImage(for imageURL: URL) -> UIImage? {
        memoryCache.object(forKey: imageURL as NSURL)
    }

    private func decode(_ data: Data, for imageURL: URL) throws -> UIImage {
        if let image = UIImage(data: data) {
            memoryCache.setObject(image, forKey: imageURL as NSURL)
            return image
        } else {
            throw InvalidImageDataError(url: imageURL)
        }
    }

    private func loadData(for request: URLRequest) async throws -> Data {
        do {
            return try await session.data(for: request).0
        } catch {
            // タスクがキャンセルされた時、`session.data(for:)`がCocoaのエラーを発生されるのですが、
            // Swiftでは`CancellationError`がもっと自然だと思います。
            // タスクがキャンセルされている場合`CancellationError`を発生させる`try Task.checkCancellation()`がちょうど良いです。
            try Task.checkCancellation()
            throw error
        }
    }

    public func loadImage(from imageURL: URL) -> LoadingImage {
        if let image = cachedImage(for: imageURL) {
            return .cached(image)
        }

        return .inProgress(Task.detached {
            let request = URLRequest(url: imageURL)

            // コードの分かりやすさのために画像が`URLCache`に入っているのかどうか区別していませんが、
            // 必要であれば`urlCache.cachedResponse(for: request)`で入っているかどうか確認できます。

            let data = try await self.loadData(for: request)
            return try self.decode(data, for: imageURL)
        })
    }
}

Project Googrename: Google Workspace で 14 年運用されたドメインエイリアスをプライマリドメインに変更 & 全ユーザーを安全にリネームする

コーポレートエンジニアリング部の id:sora_h です *1。今回は 3 ヵ月ほど前に実施した、Google Workspace テナントのプライマリドメイン変更について、記録を兼ねて説明します。

クックパッドは 2009 年頃 *2 より Google Workspace *3 を利用しています。当社の対外的なメールアドレスは cookpad.com ですが、Google ではプライマリドメインとして cookpad.jp が設定されています。各ユーザーには cookpad.com のアドレスを別名 (エイリアス) として登録されていて、メールアドレスとしては cookpad.com を利用、ただ Google へログインする時だけ cookpad.jp を利用する運用になっていました。想像が出来ると思いますが、これが様々な面で不便・混乱を発生させていました。どうしてこうなった… *4

この負債を解決すべく、2022/8 頃から緩やかに準備を始め、2023/3 上旬に全ユーザーのドメインとプライマリドメインを cookpad.com に変更しました。本稿では変更に踏み切った理由から下準備、当日~事後の作業について解説します。そこそこ長く様々なタスクがあったため乱雑な記事となっていますが、何かの役に立てば幸いです。

*1:技術部 SRE グループが主務です。一応…

*2:テナント自体は 2007 年から、業務に本格的に使われたのは 2009 年から、らしいですが詳細は不明です

*3:当時は Google Apps

*4:これも導入時期と同様に経緯は完全に損われていて不明、利用していないドメインで「一旦」設定してみて、そのまま本番利用されちゃったパターンと想像しています

続きを読む

Path Drawing in SwiftUI

Hi, this is Chris Trott (@twocentstudios) from Cookpad Mart's iOS team.

In this post I want to share a few tips for how to draw shapes using paths in SwiftUI, starting from the basics. The code in this post targets iOS 16 and Xcode 14, but is low-level enough that it should be relatively forward and backward compatible.

Drawing paths manually is not a common task in day-to-day app work. It can be especially tedious for complex shapes. However, it can sometimes be a most prudent choice over bitmaps or 3rd party rendering libraries.

You can view the complete code from this post from this gist.

Contents

  • Basic shapes
  • Styling
  • Drawing line-by-line
  • How to use arcs
  • How to use quadratic bezier curves
  • Path operations
  • Creating a chat bubble shape
  • Trimming a path
  • Transition animations

Basic shapes

SwiftUI has a protocol Shape – both conforming to, and conceptually similar to View – that we can use to draw custom shapes.

protocol Shape : Animatable, View

It has one requirement: a function that takes a CGRect and returns a Path.

import SwiftUI

struct MyCustomShape: Shape {
    func path(in rect: CGRect) -> Path {
        /// TODO: return a `Path`
    }
}

As we'll see later, the input rect is determined by SwiftUI's layout system rules, but the path we return can draw anywhere, including outside the bounds of rect.

Path is SwiftUI's drawing command primitive, while UIKit has UIBezierPath and CoreGraphics has CGPath. All are similar, but not quite the same.

Let's use SwiftUI's Path primitives to make a simple rounded rectangle.

struct RoundedRectShape: Shape {
    func path(in rect: CGRect) -> Path {
        Path(roundedRect: rect, cornerRadius: 20)
    }
}

Of course this is the same as SwiftUI's built-in shape:

RoundedRectangle(cornerRadius: 20)

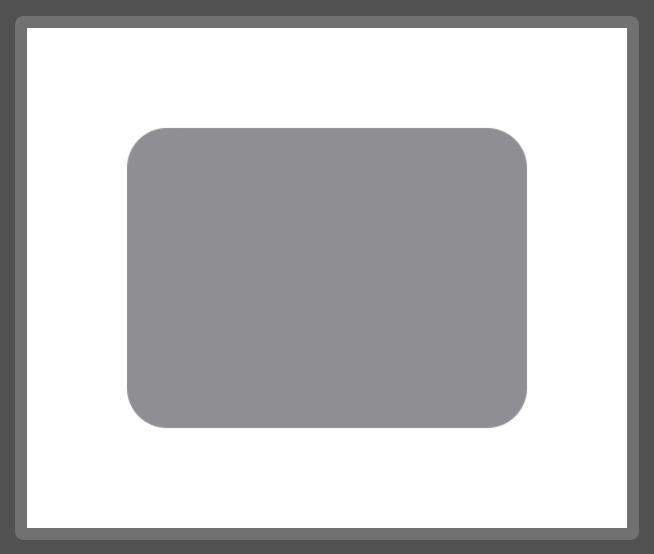
A Shape has only a "default fill based on the foreground color", so let's add a SwiftUI Preview for it.

struct RoundedRectView_Previews: PreviewProvider {
    static var previews: some View {
        RoundedRectShape()
            .fill(.gray)
            .frame(width: 200, height: 150)
            .padding(50)
            .previewLayout(.sizeThatFits)
    }
}

Why not make a custom view modifier for making previewing more convenient:

extension View {
    @ViewBuilder func previewingShape() -> some View {
        frame(width: 200, height: 150)
            .padding(50)
            .previewLayout(.sizeThatFits)
    }
}

struct RoundedRectView_Previews: PreviewProvider {
    static var previews: some View {
        RoundedRectShape()
            .fill(.gray)
            .previewingShape()
    }
}

Styling

Before we get too far into the weeds with Path, we should take a look at basic Shape styling. Otherwise, how will we be able to see what we're drawing?

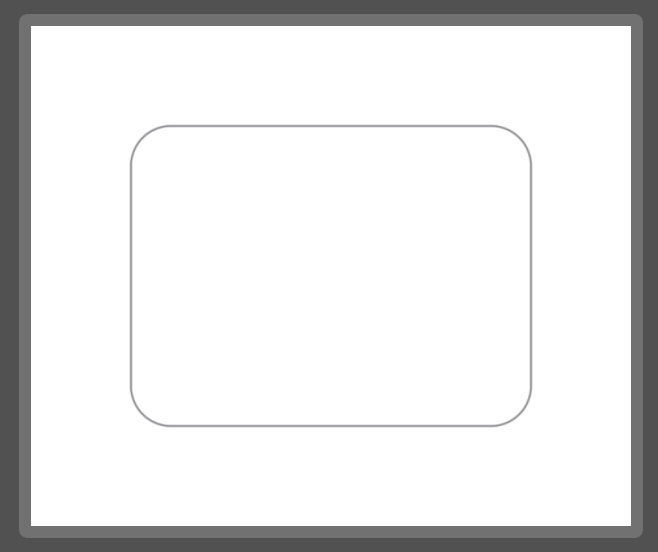
We can either stroke or fill a shape instance, but not both. This is because .stroke and .fill are both defined on Shape but return a View.

RoundedRectShape()
    .fill(.gray)
RoundedRectShape()
    .stroke(.gray)
RoundedRectShape()
    .stroke(.gray)
    .fill(.gray) // Error: Value of type 'some View' has no member 'fill'
Fill Stroke

To do both, we need to layer two separate instances of the shape:

ZStack {
    RoundedRectShape()
        .fill(.gray)

    RoundedRectShape()
        .stroke(Color.black, lineWidth: 4)
}

Drawing line-by-line

We draw a path line-by-line or curve-by-curve as if we were describing pen strokes to a friend.

  • move(to:) moves the "cursor" without drawing.
  • addLine(to:) draws a line from current "cursor" to the the to point.
  • closeSubpath() marks the subpath as closed by drawing a line from the "cursor" back to the start point if necessary.

Note: it's required to call move(to:) before adding a line or curve. Otherwise the path will not appear. When adding a complete subpath like addEllipse(in:), move(to:) is not required.

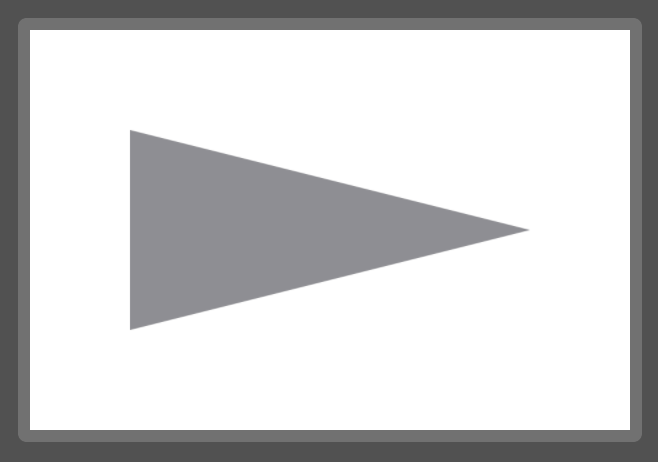
Let's draw a banner shape, starting from the bottom left corner:

struct BannerShape: Shape {
    func path(in rect: CGRect) -> Path {
        return Path { p in
            p.move(to: .init(x: rect.minX, y: rect.maxY))
            p.addLine(to: .init(x: rect.minX, y: rect.minY))
            p.addLine(to: .init(x: rect.maxX, y: rect.midY))
            p.closeSubpath()
        }
    }
}

Since we're using the rect parameter to specify our drawing points, the shape will always be relative to the size of the view.

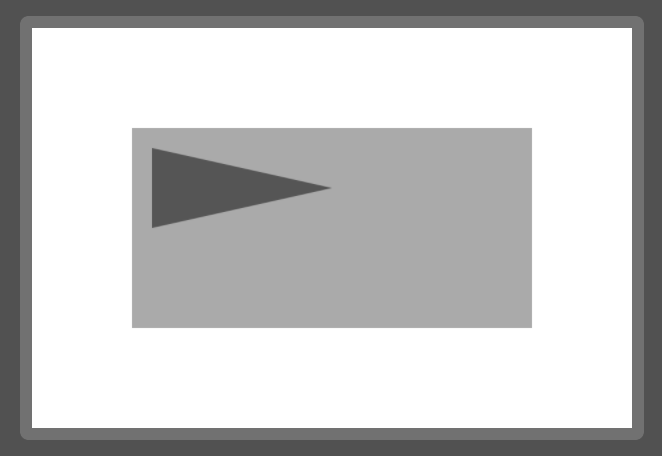
We could also specify absolute coordinates:

struct BannerAbsoluteShape: Shape {
    func path(in rect: CGRect) -> Path {
        return Path { p in
            p.move(to: .init(x: 10, y: 50))
            p.addLine(to: .init(x: 10, y: 10))
            p.addLine(to: .init(x: 100, y: 30))
            p.closeSubpath()
        }
    }
}

And you can see from the lighter gray background color I've added to the view that the path that defines the shape no longer fills it.

How to use arcs

There are three APIs for drawing an arc:

/// Adds an arc of a circle to the path, specified with a radius and a
/// difference in angle.
public mutating func addRelativeArc(center: CGPoint, radius: CGFloat, startAngle: Angle, delta: Angle, transform: CGAffineTransform = .identity)

/// Adds an arc of a circle to the path, specified with a radius and angles.
public mutating func addArc(center: CGPoint, radius: CGFloat, startAngle: Angle, endAngle: Angle, clockwise: Bool, transform: CGAffineTransform = .identity)

/// Adds an arc of a circle to the path, specified with a radius and two
/// tangent lines.
public mutating func addArc(tangent1End p1: CGPoint, tangent2End p2: CGPoint, radius: CGFloat, transform: CGAffineTransform = .identity)

The first two add a new subpath disconnected from the current path.

The last one – using tangents – adds an arc connected to the current subpath. We can use this API to add an arc to a line-by-line drawing session like the banner above.

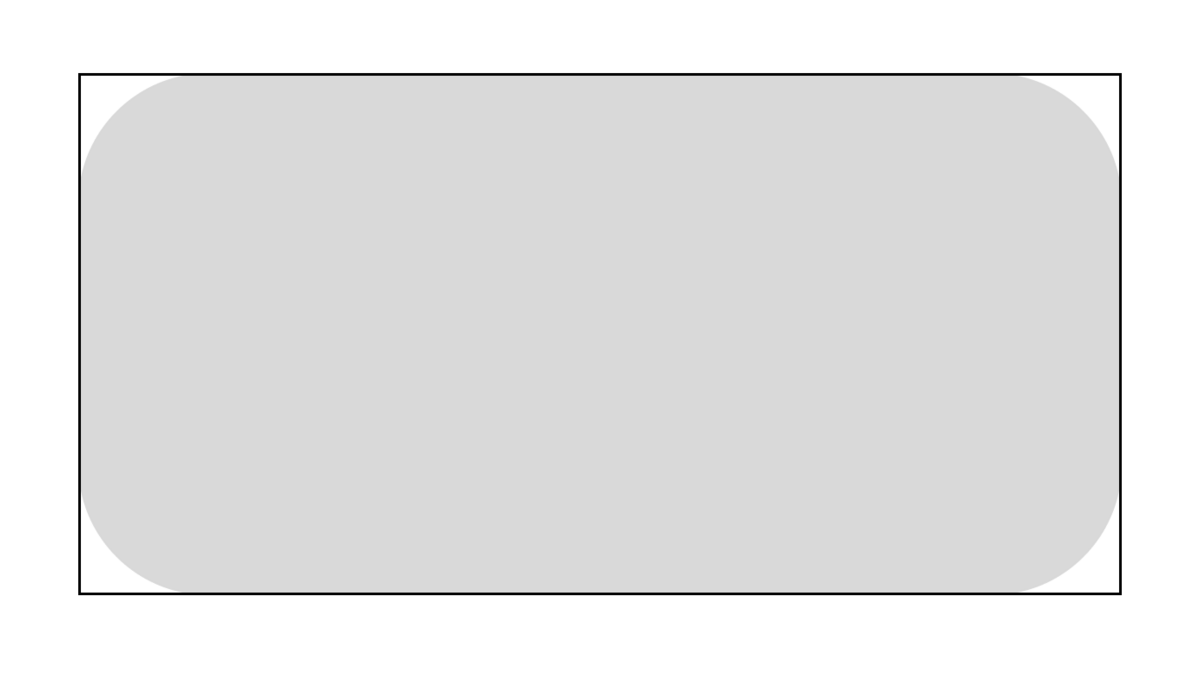
Let's create the rounded rectangle shape with only the addLine and addArc primitives. It should take a corner radius as a parameter and draw inside the provided bounds rectangle.

First, we'll visualize what we want to draw. The black-outlined rectangle is a representation of our input rectangle and the gray-filled shape is the target shape we want to draw.

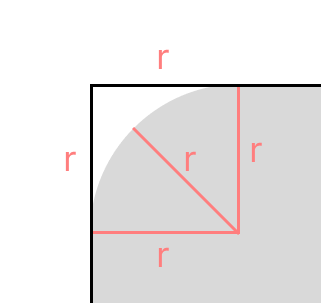
The corner radius r can be visualized as a square, situated at each corner of the bounds rectangle, with side r.

Looking at the addArc) function again:

func addArc(tangent1End p1: CGPoint, tangent2End p2: CGPoint, radius: CGFloat)

We need to assemble 4 parameters:

  1. startPoint (implicit; this is where the "cursor" is)
  2. tangent1End
  3. tangent2End
  4. radius

We only know (4) radius.

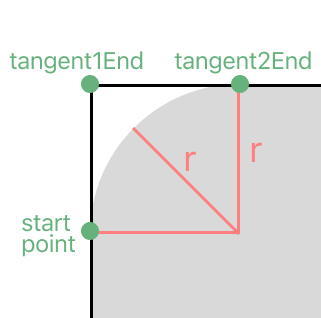
Despite the potentially 🤔 names, the tangents correspond to the following points on the aforementioned square:

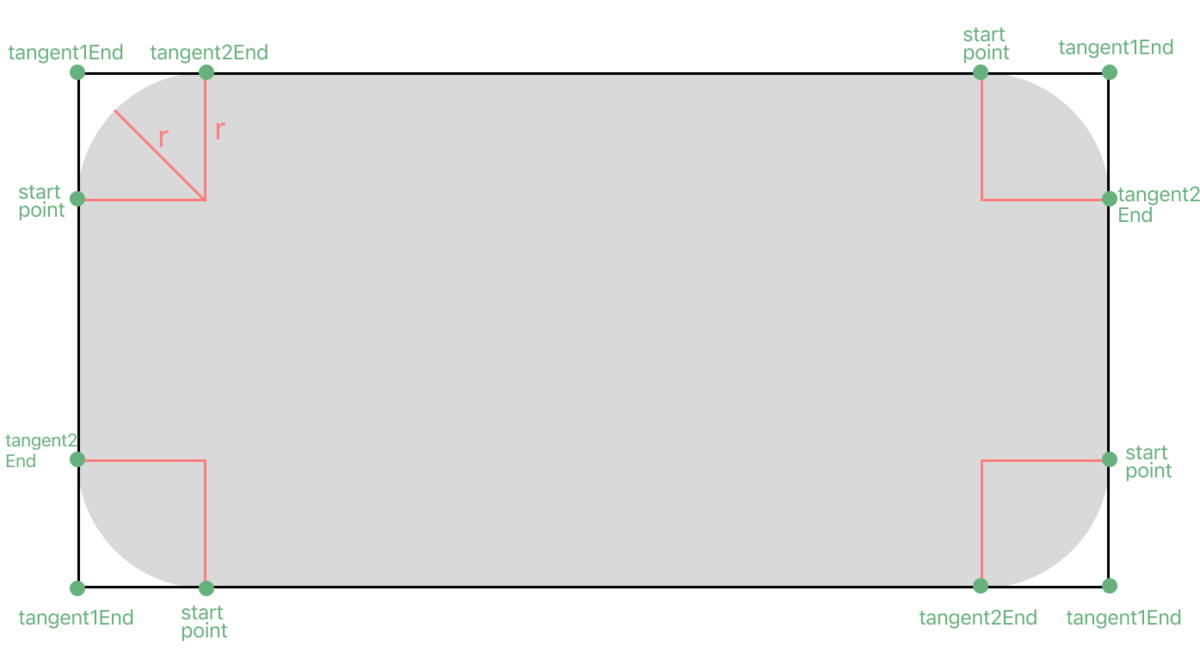
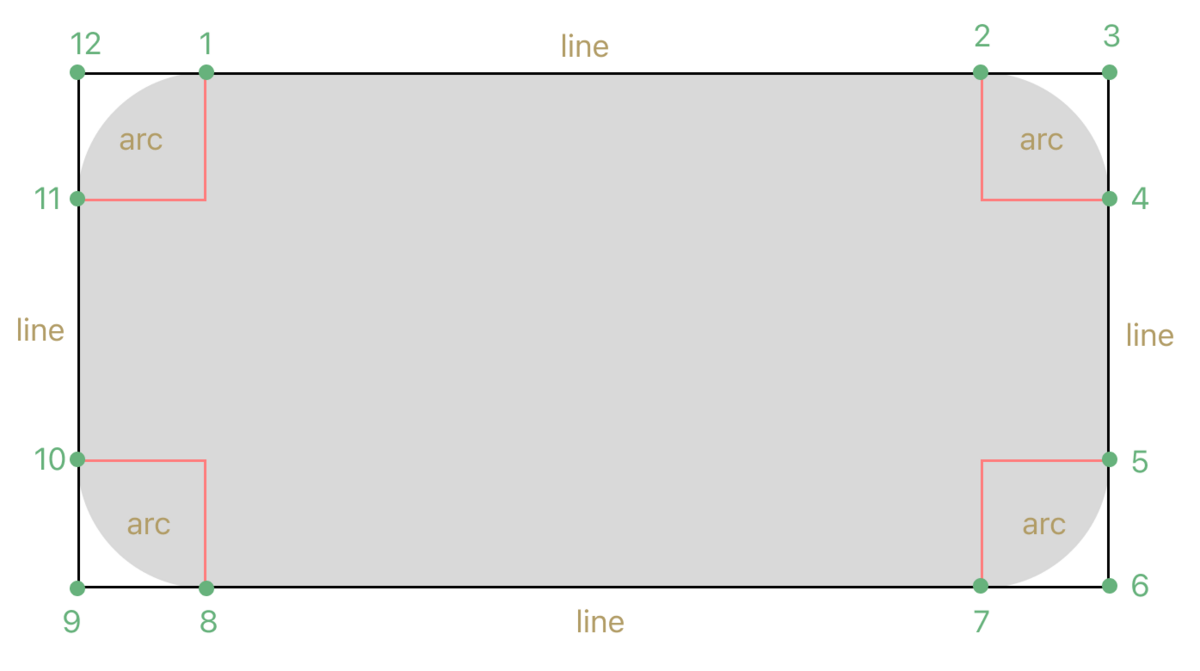
Zooming out to the whole rectangle, if we decide to draw clockwise, that means we'll have 4 arcs with the following points:

Let's alternate drawing lines and arcs, clockwise, and in the following order:

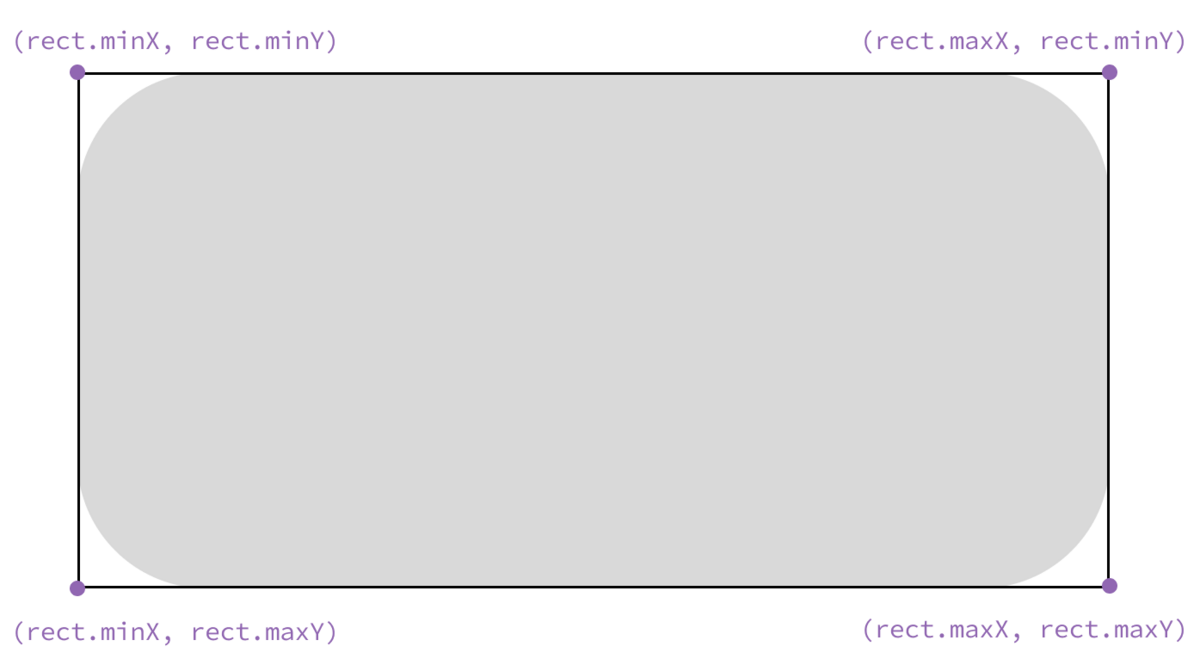
We want the points to be drawn relative to the bounds rectangle. We can use the following helper functions on CGRect to derive the corner points we need:

  • CGRect.minX
  • CGRect.maxX
  • CGRect.minY
  • CGRect.maxY
  • CGRect.midX (also useful)
  • CGRect.midY (also useful)

If you mix up these helpers while writing drawing code, you're in good company.

We derive the non-corner points by adding or subtracting the corner radius.

With all the details worked out, all we have to do is arrange the code:

struct RoundedRectArcUnsafeShape: Shape {
    let cornerRadius: CGFloat
    func path(in rect: CGRect) -> Path {
        Path { p in
            p.move(to: .init(x: rect.minX + cornerRadius, y: rect.minY))
            p.addLine(to: .init(x: rect.maxX - cornerRadius, y: rect.minY))
            p.addArc(
                tangent1End: .init(x: rect.maxX, y: rect.minY),
                tangent2End: .init(x: rect.maxX, y: rect.minY + cornerRadius),
                radius: cornerRadius
            )
            p.addLine(to: .init(x: rect.maxX, y: rect.maxY - cornerRadius))
            p.addArc(
                tangent1End: .init(x: rect.maxX, y: rect.maxY),
                tangent2End: .init(x: rect.maxX - cornerRadius, y: rect.maxY),
                radius: cornerRadius
            )
            p.addLine(to: .init(x: rect.minX + cornerRadius, y: rect.maxY))
            p.addArc(
                tangent1End: .init(x: rect.minX, y: rect.maxY),
                tangent2End: .init(x: rect.minX, y: rect.maxY - cornerRadius),
                radius: cornerRadius
            )
            p.addLine(to: .init(x: rect.minX, y: rect.minY + cornerRadius))
            p.addArc(
                tangent1End: .init(x: rect.minX, y: rect.minY),
                tangent2End: .init(x: rect.minX + cornerRadius, y: rect.minY),
                radius: cornerRadius
            )
            p.closeSubpath()
        }
    }
}

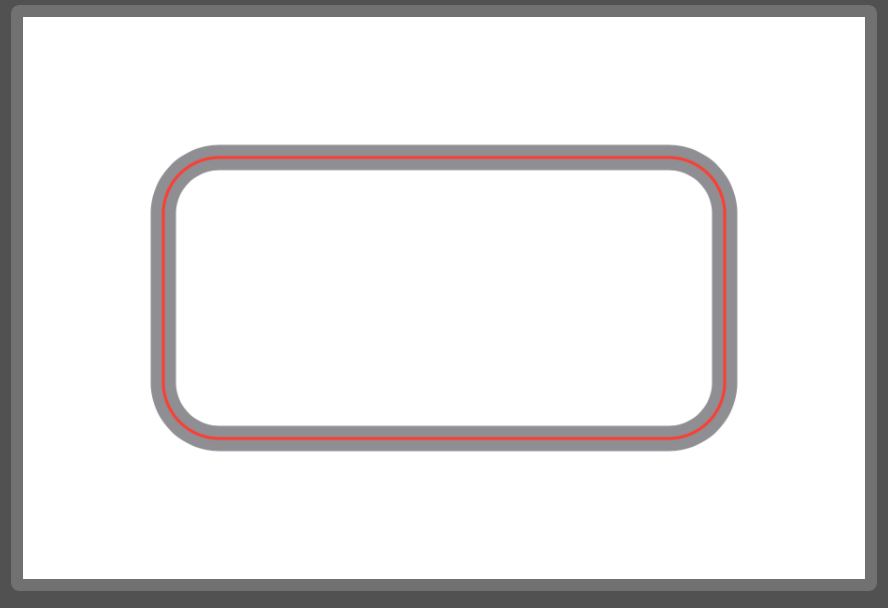
If we overlay SwiftUI's build-in RoundedRectangle shape, ours looks pretty good:

struct RoundedRectArcUnsafeView_Previews: PreviewProvider {
    static var previews: some View {
        let cornerRadius: CGFloat = 20
        ZStack {
            RoundedRectArcUnsafeShape(cornerRadius: cornerRadius)
                .stroke(.gray, lineWidth: 9)
            RoundedRectangle(cornerRadius: cornerRadius, style: .circular)
                .stroke(.red, lineWidth: 1)
        }
        .previewingShape()
    }
}

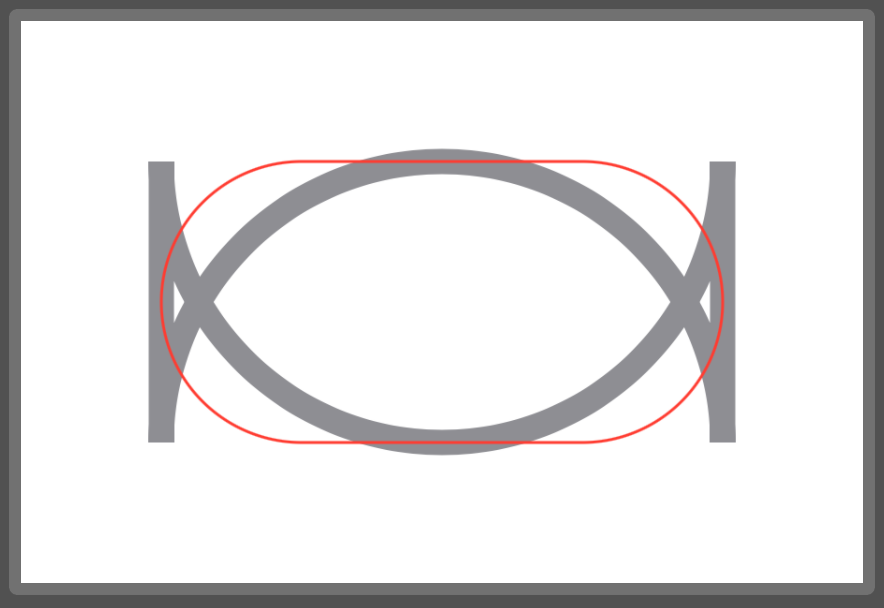
But what happens if we make cornerRadius something like 100 (when our shape height is 100)?

Looks like SwiftUI's version does some bounds checking so the shape becomes a capsule or circle. Let's fix our implementation:

struct RoundedRectArcShape: Shape {
    let cornerRadius: CGFloat
    func path(in rect: CGRect) -> Path {
        let maxBoundedCornerRadius = min(min(cornerRadius, rect.width / 2.0), rect.height / 2.0)
        let minBoundedCornerRadius = max(maxBoundedCornerRadius, 0.0)
        let boundedCornerRadius = minBoundedCornerRadius
        return Path { p in
            p.move(to: .init(x: rect.minX + boundedCornerRadius, y: rect.minY))
            // ...
        }
    }
}

That's better. As a bonus, I'm showing SwiftUI's .continuous corner style in blue over the .circular style in red.

How to use quadratic bezier curves

We often want to avoid the kinds of sharp corners that appear when connecting lines, but don't necessarily want to use circular arcs.

For smoother lines, the Path API gives us:

  • addCurve for cubic Bézier curves
  • addQuadCurve for quadratic Bézier curves

Cubic Bézier curves give us a lot of flexibility. They can also be a weighty topic. I recommend this YouTube video by Freya Holmér.

I've found quadratic Bézier curves as a nice compromise between flexibility and complexity, so let's try to quickly build some intuition on how to use them.

Let's start by looking at the addQuadCurve) function:

func addQuadCurve(to p: CGPoint, control cp: CGPoint)

We need to assemble 3 parameters:

  1. startPoint (implicit; this is where the "cursor" is)
  2. endPoint (p)
  3. controlPoint (cp)

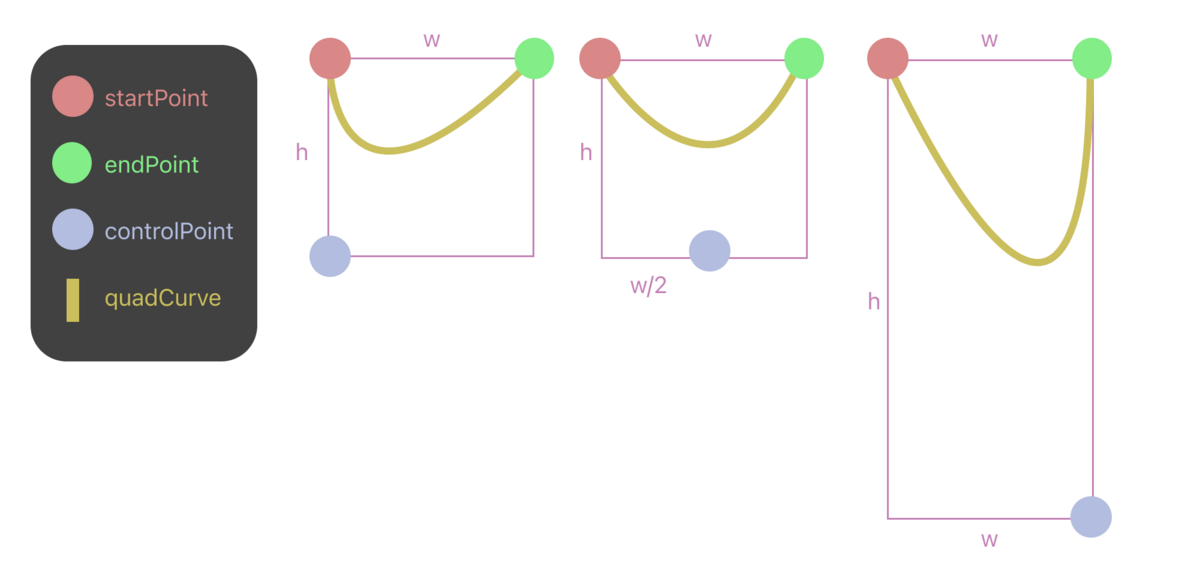
When we set up the three points as various triangles, we can see that the curve is stretched towards the control point.

Calculating the actual positions of the three points will depend on our use case.

Let's say we want to draw a simple quad curve as a "scoop" with the control point at the bottom. But we'll allow the caller to specify a relative position on the x-axis for the control point.

Add the input rectangle to our planning diagram will help us determine how to calculate each of the three points:

With that, here's the code:

struct QuadCurveScoop: Shape {
    /// 0...1
    var pointOffsetFraction: CGFloat = 0.0

    func path(in rect: CGRect) -> Path {
        Path { p in
            p.move(to: .init(x: rect.minX, y: rect.minY))
            p.addQuadCurve(
                to: .init(x: rect.maxX, y: rect.minY),
                control: .init(x: rect.maxX * pointOffsetFraction, y: rect.maxY)
            )
        }
    }
}

If we don't explicitly close the subpath, SwiftUI presumably closes it for us when drawing.

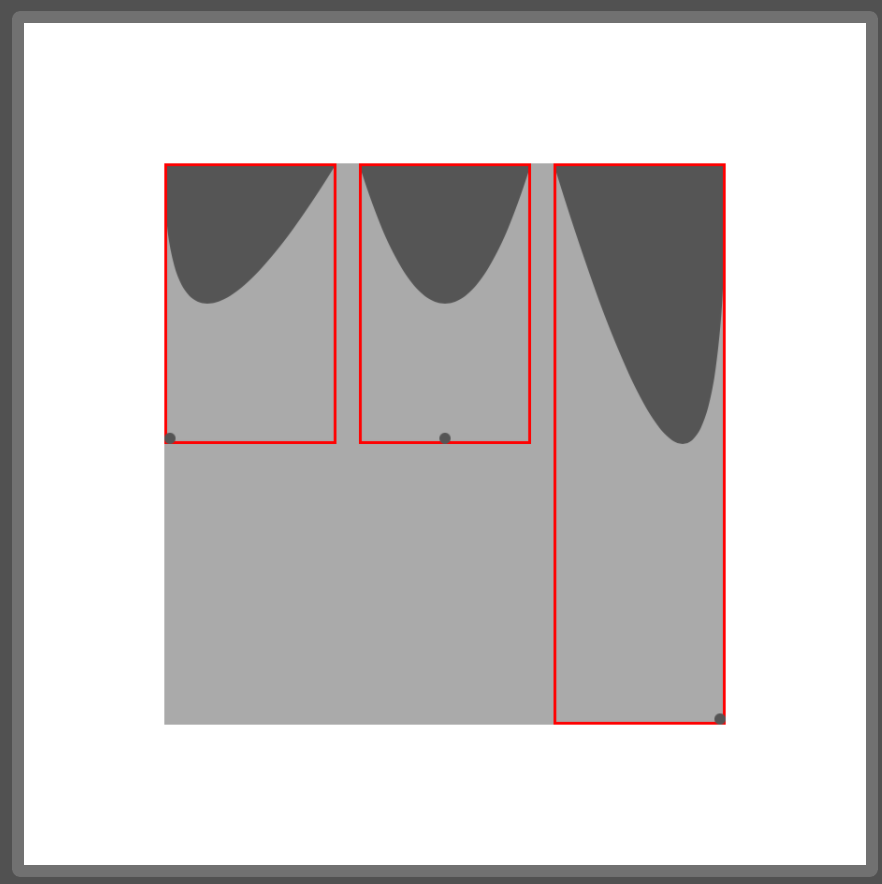
I've set up the preview to mimic the figure above, and I've added an overlay to show the input rectangle and approximate control point for each curve.

Path operations

Path operations look like set operations: union, intersection, subtracting, etc.

These operations allow us to combine subpaths in unique ways, without necessarily needing to draw line-by-line or arc-by-arc.

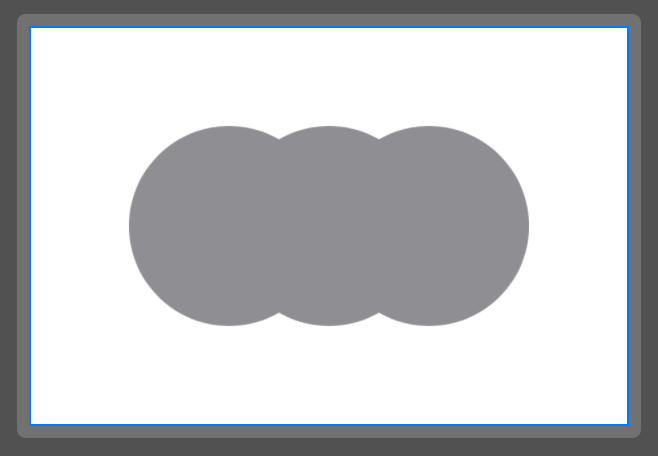
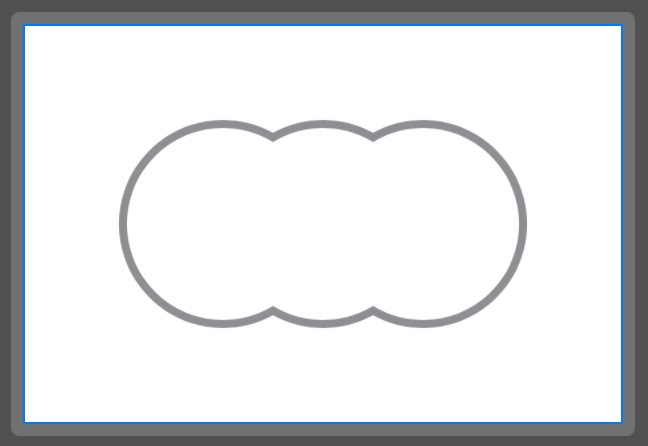
Let's try making a cloud shape by adding together 3 ellipses:

struct Cloud1Shape: Shape {
    func path(in rect: CGRect) -> Path {
        let inset = rect.width / 2.0
        return Path { p in
            p.addEllipse(in: rect.inset(by: .init(top: 0, left: 0, bottom: 0, right: inset)))
            p.addEllipse(in: rect.inset(by: .init(top: 0, left: inset / 2.0, bottom: 0, right: inset / 2.0)))
            p.addEllipse(in: rect.inset(by: .init(top: 0, left: inset, bottom: 0, right: 0)))
        }
    }
}

When we fill it, it looks fine:

struct Cloud1View_Previews: PreviewProvider {
    static var previews: some View {
        Cloud1Shape()
            .fill(.gray)
            .previewingShape()
    }
}

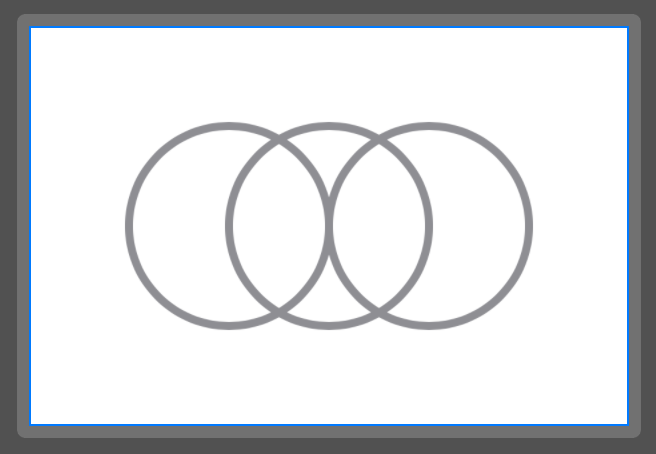
But if we decide to draw an outline instead, it looks like 3 ellipses:

We can fix this by joining the shapes together using the union path operation.

The path operation APIs are available on iOS 16+. Unfortunately, they're defined on CGPath and not Path. It's simple to convert between them, but we'll have to rewrite our path drawing code.

struct Cloud2Shape: Shape {
    func path(in rect: CGRect) -> Path {
        let inset = rect.width / 2.0
        let leftEllipse = Path(ellipseIn: rect.inset(by: .init(top: 0, left: 0, bottom: 0, right: inset)))
        let centerEllipse = Path(ellipseIn: rect.inset(by: .init(top: 0, left: inset / 2.0, bottom: 0, right: inset / 2.0)))
        let rightEllipse = Path(ellipseIn: rect.inset(by: .init(top: 0, left: inset, bottom: 0, right: 0)))
        let combinedCGPath = leftEllipse.cgPath
            .union(centerEllipse.cgPath)
            .union(rightEllipse.cgPath)
        return Path(combinedCGPath)
    }
}

Now when we outline the shape, we get a cloud again.

Creating a chat bubble shape

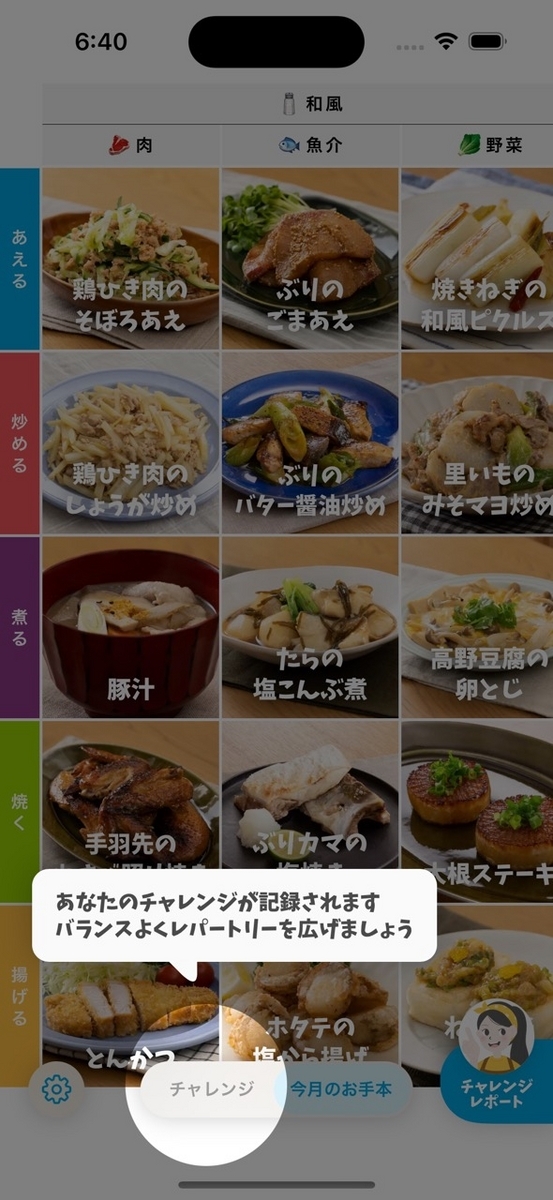
I used the above techniques to create a chat bubble shape for the onboarding section of the recently decommissioned Tabedori たべドリ app.

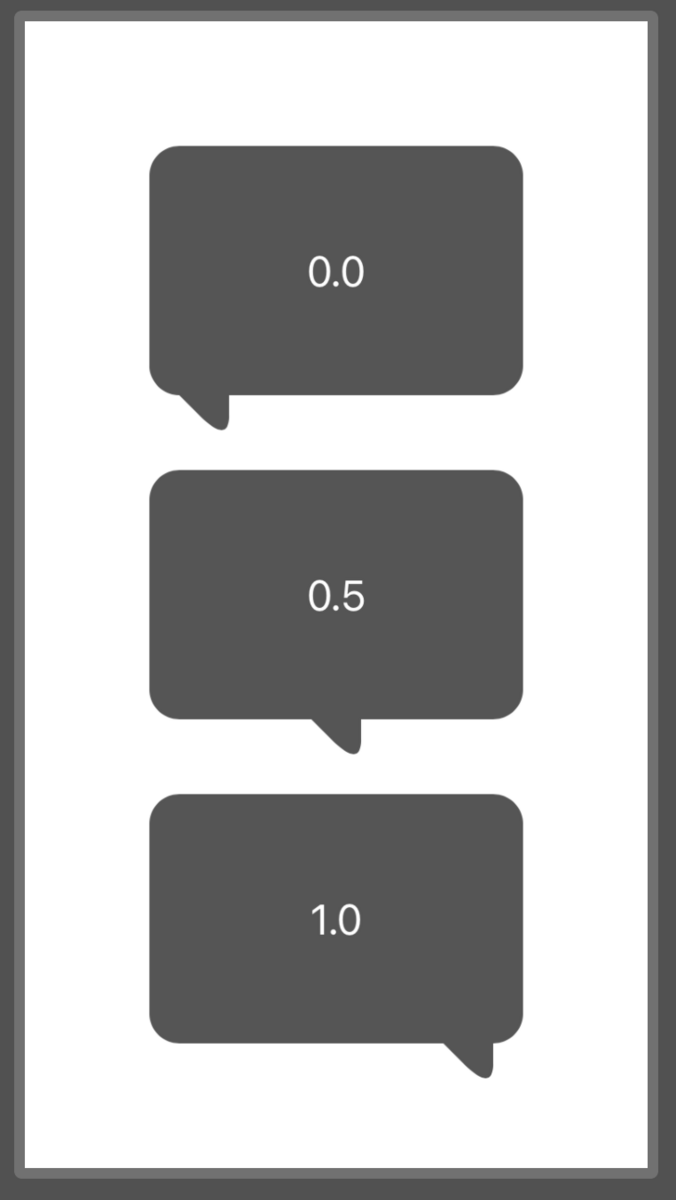
The arrow position on the bottom can be adjusted by providing arrowOffsetFraction.

struct MapOnboardingBubbleShape: Shape {
    var cornerRadius: CGFloat = 12
    var arrowRectSize: CGFloat = 20
    var arcLength: CGFloat = 12

    /// 0.0 = left, 0.5 = center, 1.0 = right
    var arrowOffsetFraction: CGFloat = 0.5

    func baseXPos(for rect: CGRect) -> CGFloat {
        (rect.maxX - cornerRadius - cornerRadius - arrowRectSize) * arrowOffsetFraction + cornerRadius
    }

    func path(in rect: CGRect) -> Path {
        let roundedRect = Path(roundedRect: rect, cornerRadius: cornerRadius)
        let arrowPath = Path { p in
            p.move(to: .init(x: baseXPos(for: rect), y: rect.maxY))
            p.addLine(to: .init(
                x: baseXPos(for: rect) + arrowRectSize - arcLength,
                y: rect.maxY + arrowRectSize - arcLength
            ))
            p.addQuadCurve(
                to: .init(
                    x: baseXPos(for: rect) + arrowRectSize,
                    y: rect.maxY + arrowRectSize - arcLength
                ),
                control: .init(
                    x: baseXPos(for: rect) + arrowRectSize,
                    y: rect.maxY + arrowRectSize
                )
            )
            p.addLine(to: .init(x: baseXPos(for: rect) + arrowRectSize, y: rect.maxY))
            p.closeSubpath()
        }
        let combinedCGPath = roundedRect.cgPath.union(arrowPath.cgPath)
        let combinedPath = Path(combinedCGPath)
        return combinedPath
    }
}

The arrowOffsetFraction is the text inside the bubble.

Here's a screenshot of it in context:

Trimming a path

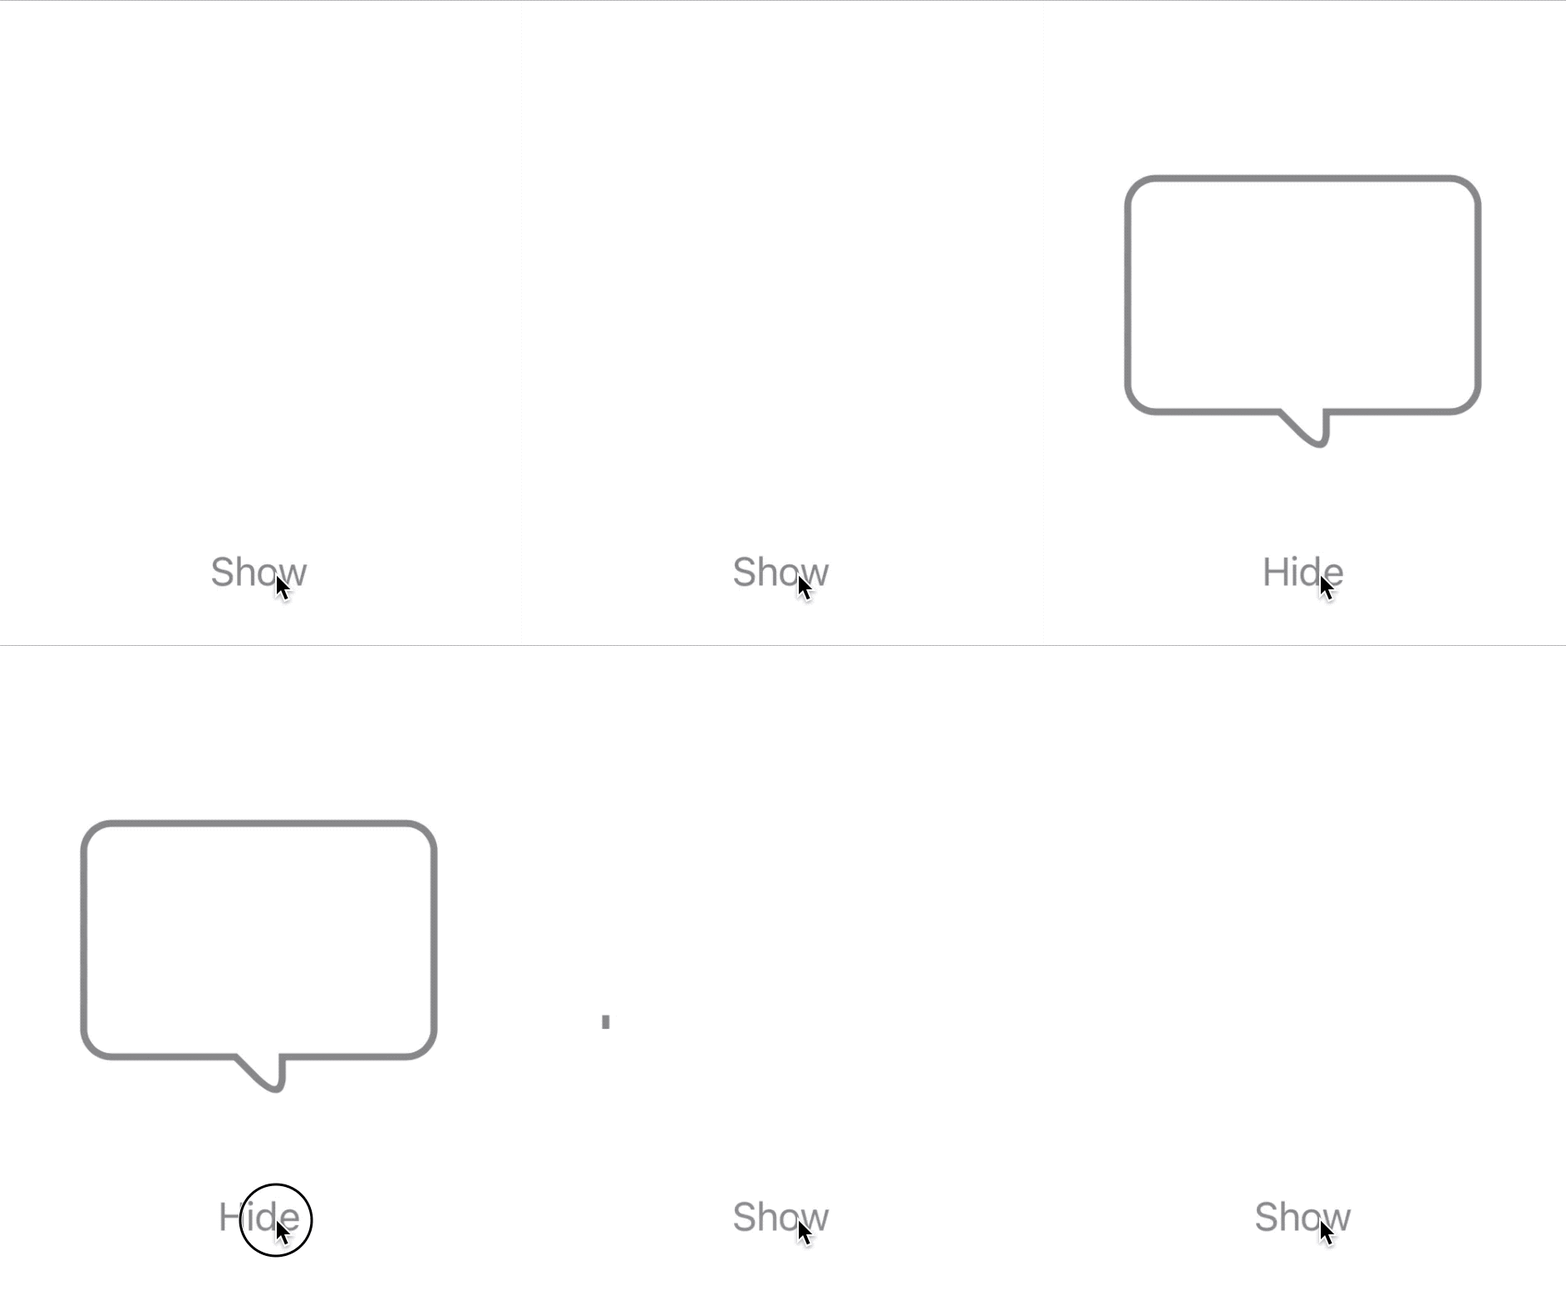
Animating the path is something that can't be done (easily) with a single static image, but is easy to do with a Shape.

The trim modifier on Shape allows you to draw only a variable fraction of the path.

Since SwiftUI is adept at many kinds of animations, we can use it to animate the path being drawn:

struct DrawBubbleView: View {
    @State var drawFraction: CGFloat = 0

    var body: some View {
        VStack {
            MapOnboardingBubbleShape()
                .trim(from: 0, to: drawFraction)
                .stroke(.gray, lineWidth: 3)
                .animation(.spring(), value: drawFraction)
                .frame(width: 150, height: 100)
                .padding(.bottom, 50)

            Button(drawFraction > 0.0 ? "Hide" : "Show") {
                drawFraction = drawFraction > 0.0 ? 0.0 : 1.0
            }
            .tint(Color.gray)
        }
    }
}

Transition animations

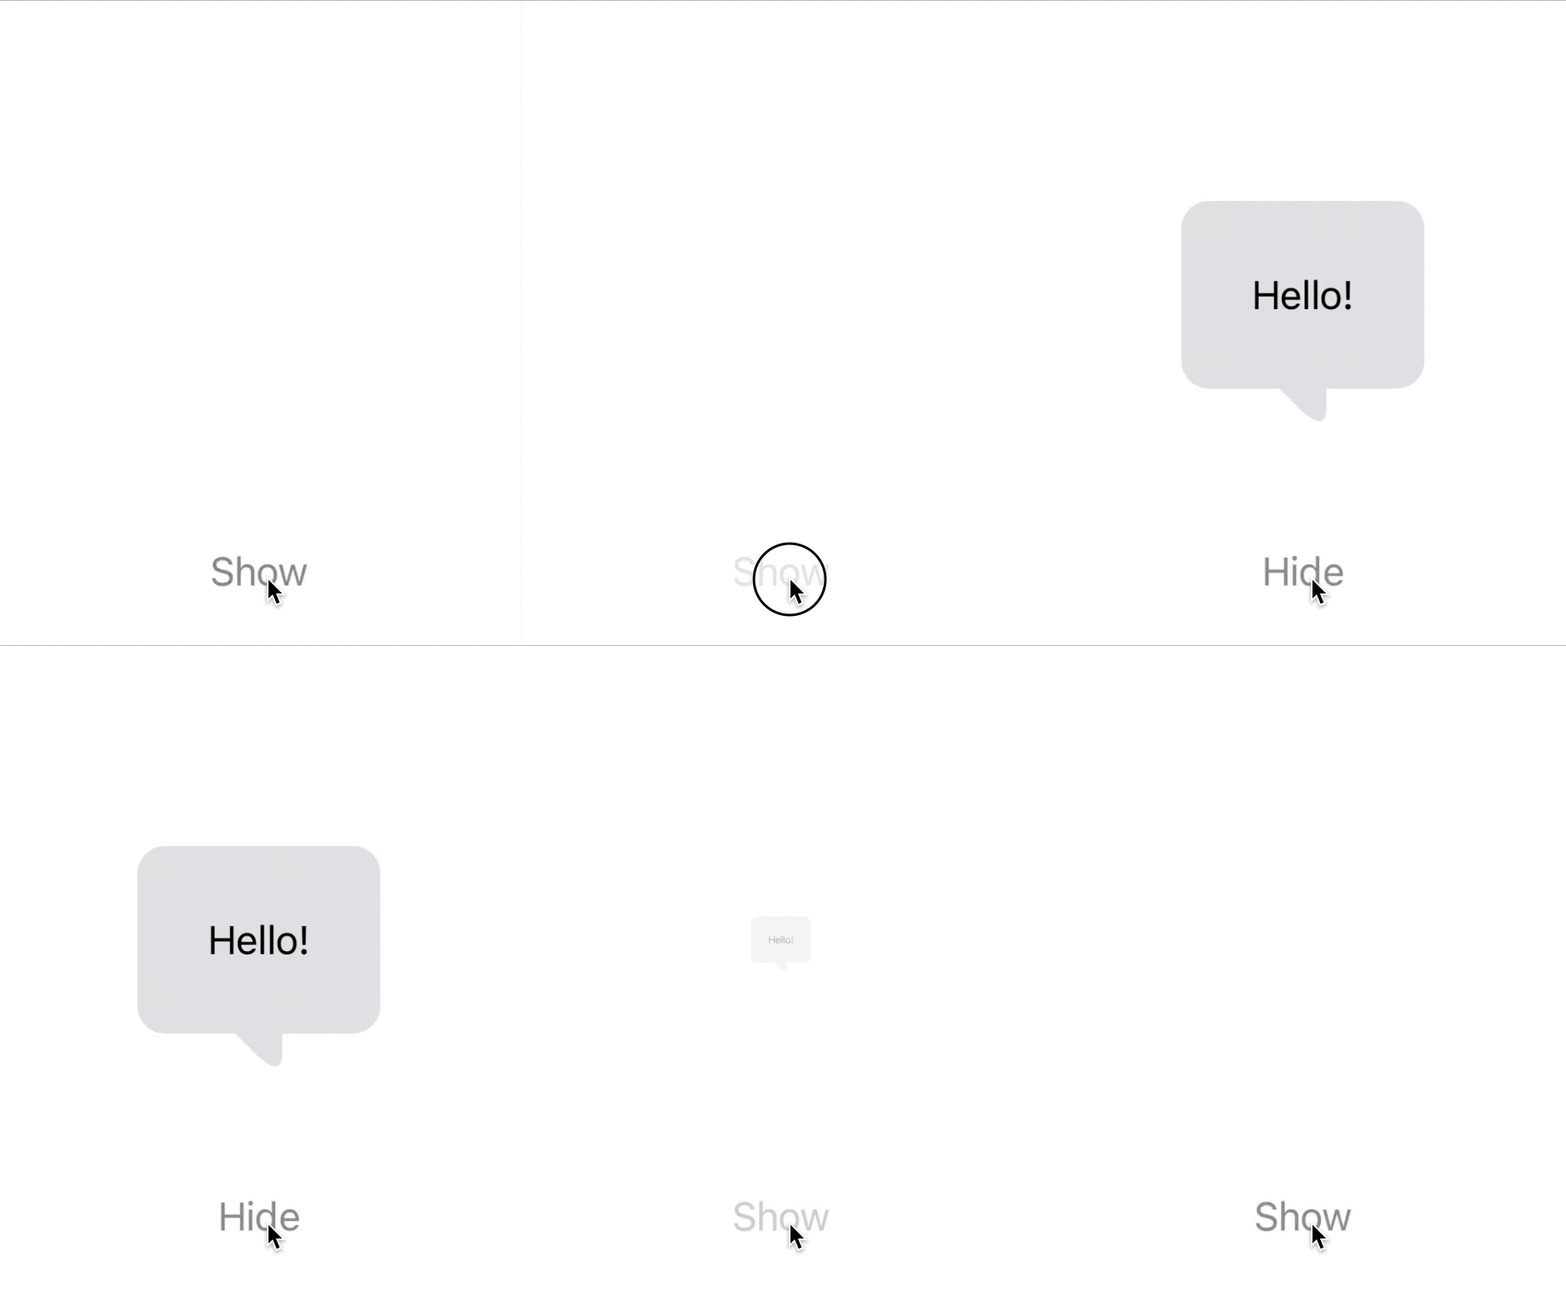
And finally, since Shapes have appearance/disappearance transitions like any other View, we can add a fun springy insertion animation.

struct BubbleTransitionView: View {
    @State var isVisible: Bool = false

    var body: some View {
        VStack {
            ZStack {
                if isVisible {
                    Text("Hello!")
                        .padding(30)
                        .background {
                            MapOnboardingBubbleShape().fill(Color(.systemGray5))
                        }
                        .transition(.opacity.combined(with: .scale).animation(.spring(response: 0.25, dampingFraction: 0.7)))
                }
            }
            .frame(width: 200, height: 100)
            .padding(.bottom, 50)

            Button(isVisible ? "Hide" : "Show") {
                isVisible.toggle()
            }
        }
    }
}

Conclusion

Thanks for reading! I hope this post has led you on a path of enlightenment.